


All features of Eve Outdoor Cam
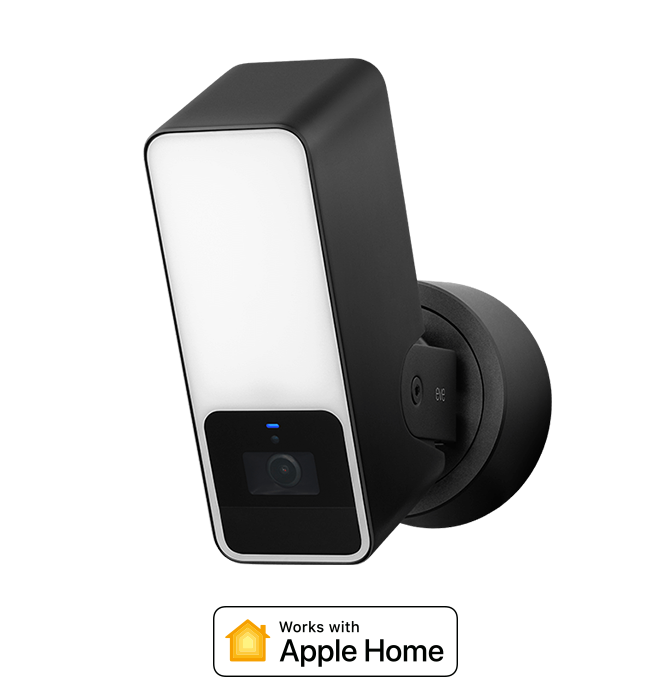
As the first floodlight camera designed exclusively for HomeKit Secure Video, Eve Outdoor Cam perfectly represents Eve's values: Thanks to Apple's technology, it represents the state of the art in terms of functionality, privacy and security. And it is enriched with important additional features through the Eve app – naturally without registration, cloud connection, tracking or profiling.
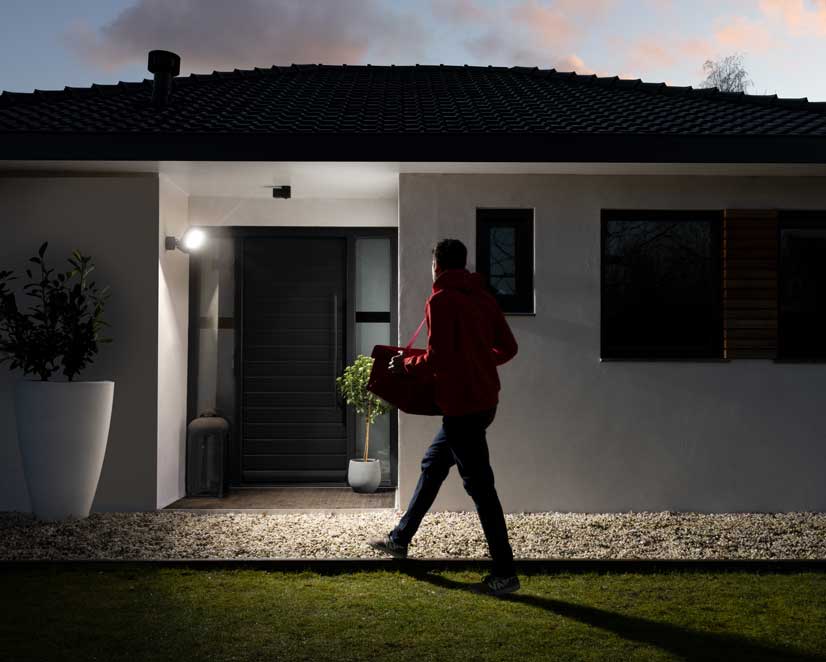
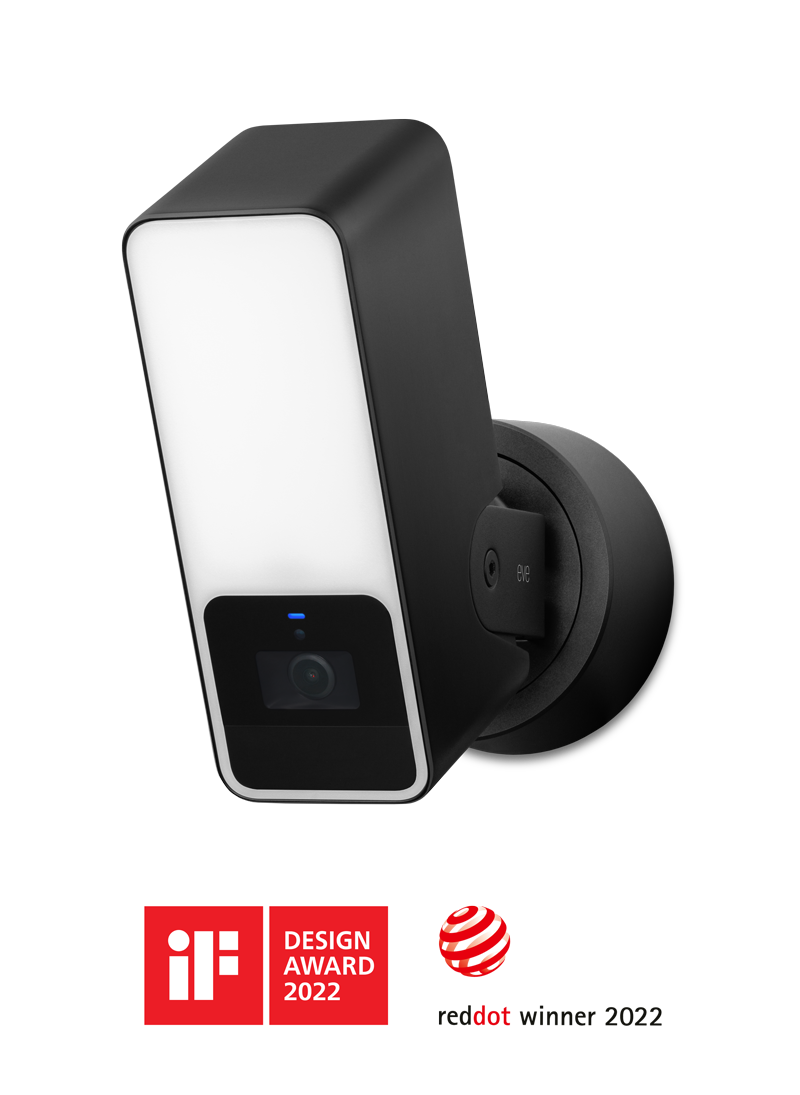
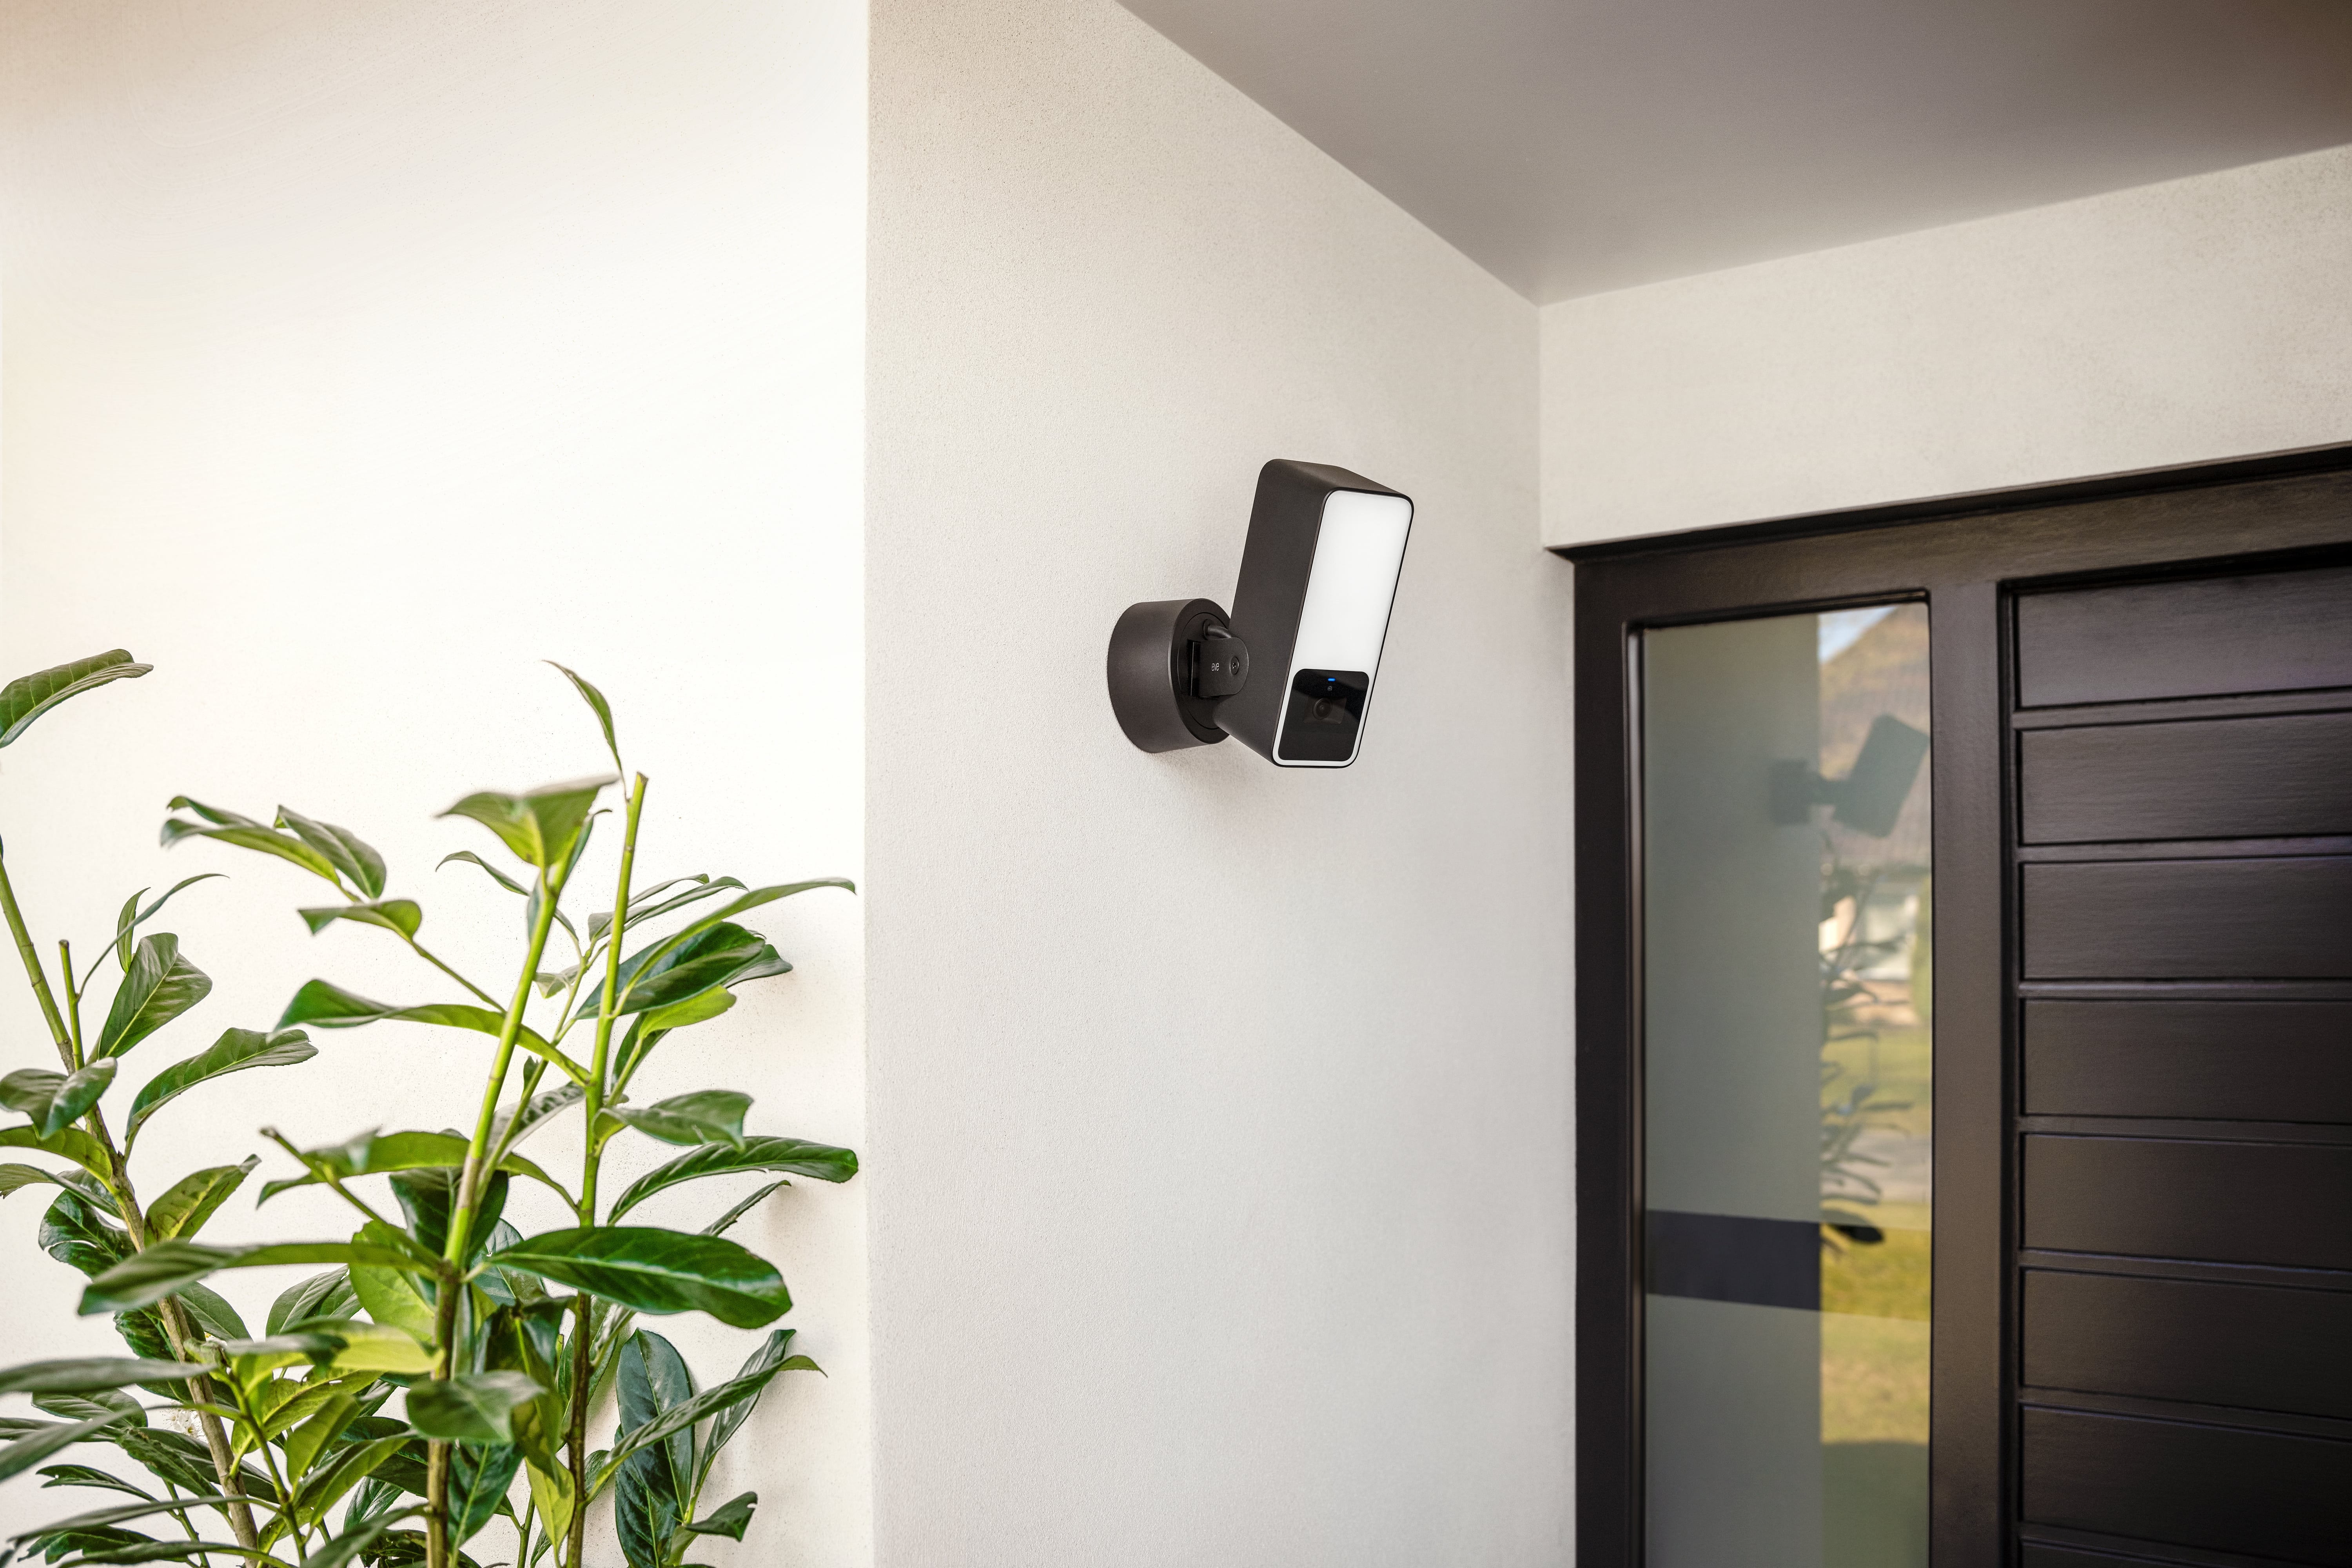
The hardware itself, which has won the Red Dot and iF Design Awards, also meets the highest standards. It is characterized by a slim, one-piece housing with a metal frame, a compact base, and a three-axis joint. This means you can install and adjust Eve Outdoor Cam flexibly. Its appearance is always striking – but without looking out of place.
In this article, you'll learn about Eve Outdoor Cam and get tips on placement, setup, automation, and troubleshooting.
Eve Outdoor Cam is designed exclusively for HomeKit – and with Apple HomeKit Secure Video, everything is analyzed locally. This means you don’t have to worry about your data being streamed to some random server in the ether as Eve rather relies on your Apple infrastructure. You set the criteria for when your recordings are stored fully encrypted in your iCloud account. And only your personal devices have the key to unlock and show these recordings.
The live stream from Eve Outdoor Cam never touches a cloud – not even iCloud.
Learn how HomeKit Secure Video works. More information about the security architecture underlying HomeKit technology is available in the Apple Platform Security document. It explains how the encryption architecture of HomeKit and HomeKit Secure Video are designed.
Hardware & requirements
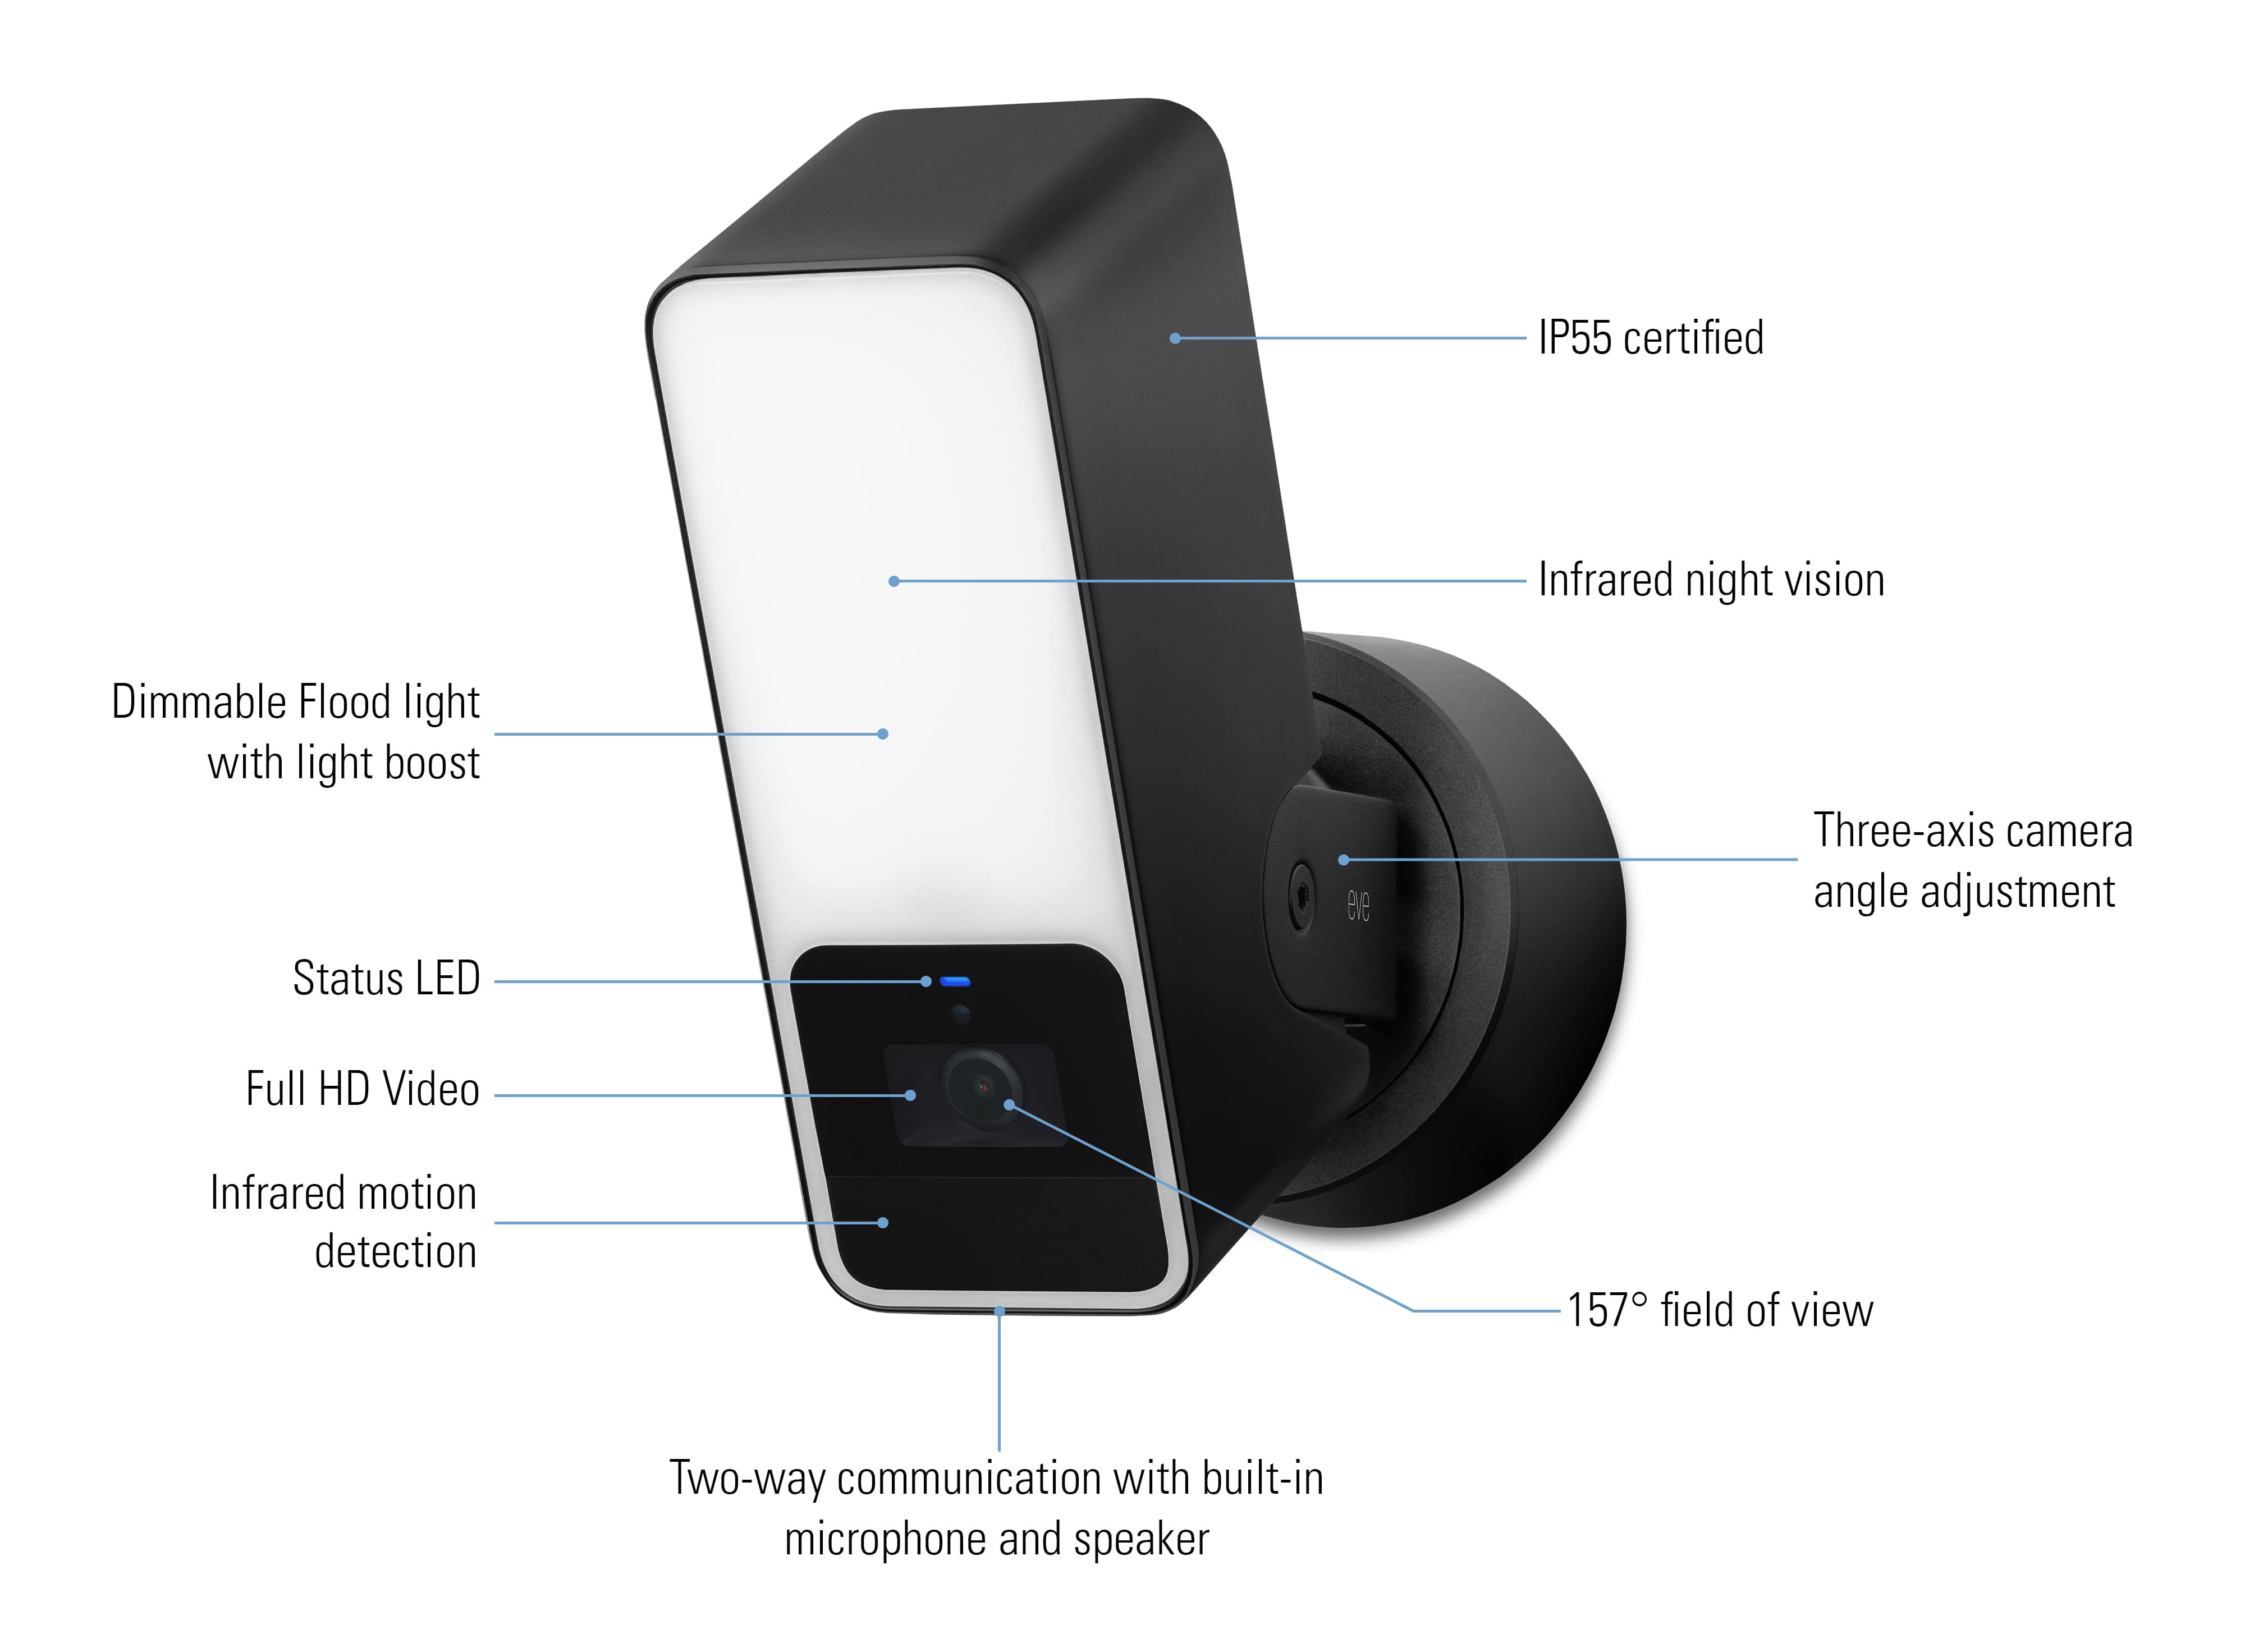
What's where on your Eve Outdoor Cam? The front of Eve Outdoor Cam's IP55-rated aluminum housing is adorned with an opaque white bezel behind which the LEDs of the dimmable floodlight operate, including the functions brightness boost and infrared night vision illumination. Below it are the full-HD camera with its wide-angle field of view of 157°, the infrared motion sensor with a range of 9 m and a detection angle of 100° (at a mounting height of 2.50 m), microphone and speaker, and the status LED.
The connection to the base is made by the joint, which allows rotation in three axes and whose bracket, like the frame of the camera body, is made of metal.
What are the structural requirements for the location of your Eve Outdoor Cam? You screw the base onto an outer wall, ideally in place of an existing light or wherever there is a mounting option along with a power supply with neutral conductor (N, blue), outer conductor (L, brown) and protective conductor (PE, yellow-green).
You connect the Eve Outdoor Cam to your 2.4 GHz WLAN. This band is more suitable for outdoor devices than the 5 GHz band, because in practice it is less sensitive to damping structural elements, i.e. walls. If your WLAN signal is not sufficient for where you want to install the camera, place the router closer – if possible – or use a WLAN repeater or additional mesh node.
Detailed installation instructions for Eve Outdoor Cam are available as a video and as a PDF.
Please note: if you are unsure or uncomfortable about installing Eve Outdoor Cam, consult a qualified electrician. To be installed and/or used in accordance with appropriate electrical codes and regulations.
Place of installation
Eve Outdoor Cam's design, which combines camera, floodlight, and motion sensor in one housing, makes alignment especially easy. No matter which position you rotate, tilt and pan the camera, the monitored, illuminated and recorded areas are always in line.
The infrared motion sensor cannot see through glass, so Eve Outdoor Cam should not operate behind or above balcony glazing. Reflected light from the night vision LEDs can significantly affect image quality. Therefore, keep walls, other surfaces and objects from protruding into the illuminated area.
Please follow the applicable law regarding video surveillance of private property. Use the adhesive labels included with the camera to warn visitors that they may be recorded.
Basic settings for HomeKit Secure Video
To distinguish between footage of animals, people, vehicles, and packages, and to benefit from iCloud-supported recording capability, you need a supported iCloud storage plan. You can connect a single camera to a 50 GB storage plan. And if you’ve got up to five cameras – whether Eve Outdoor Cam or another vendor’s product that utilizes HomeKit Secure Video – you’ll need a 200 GB plan. If you book 2 TB of storage, you can run an unlimited number of cameras with full functionality. The encrypted recordings are stored securely for ten days in your personal iCloud account without them counting against your iCloud storage limit, no matter how much space you've paid for.

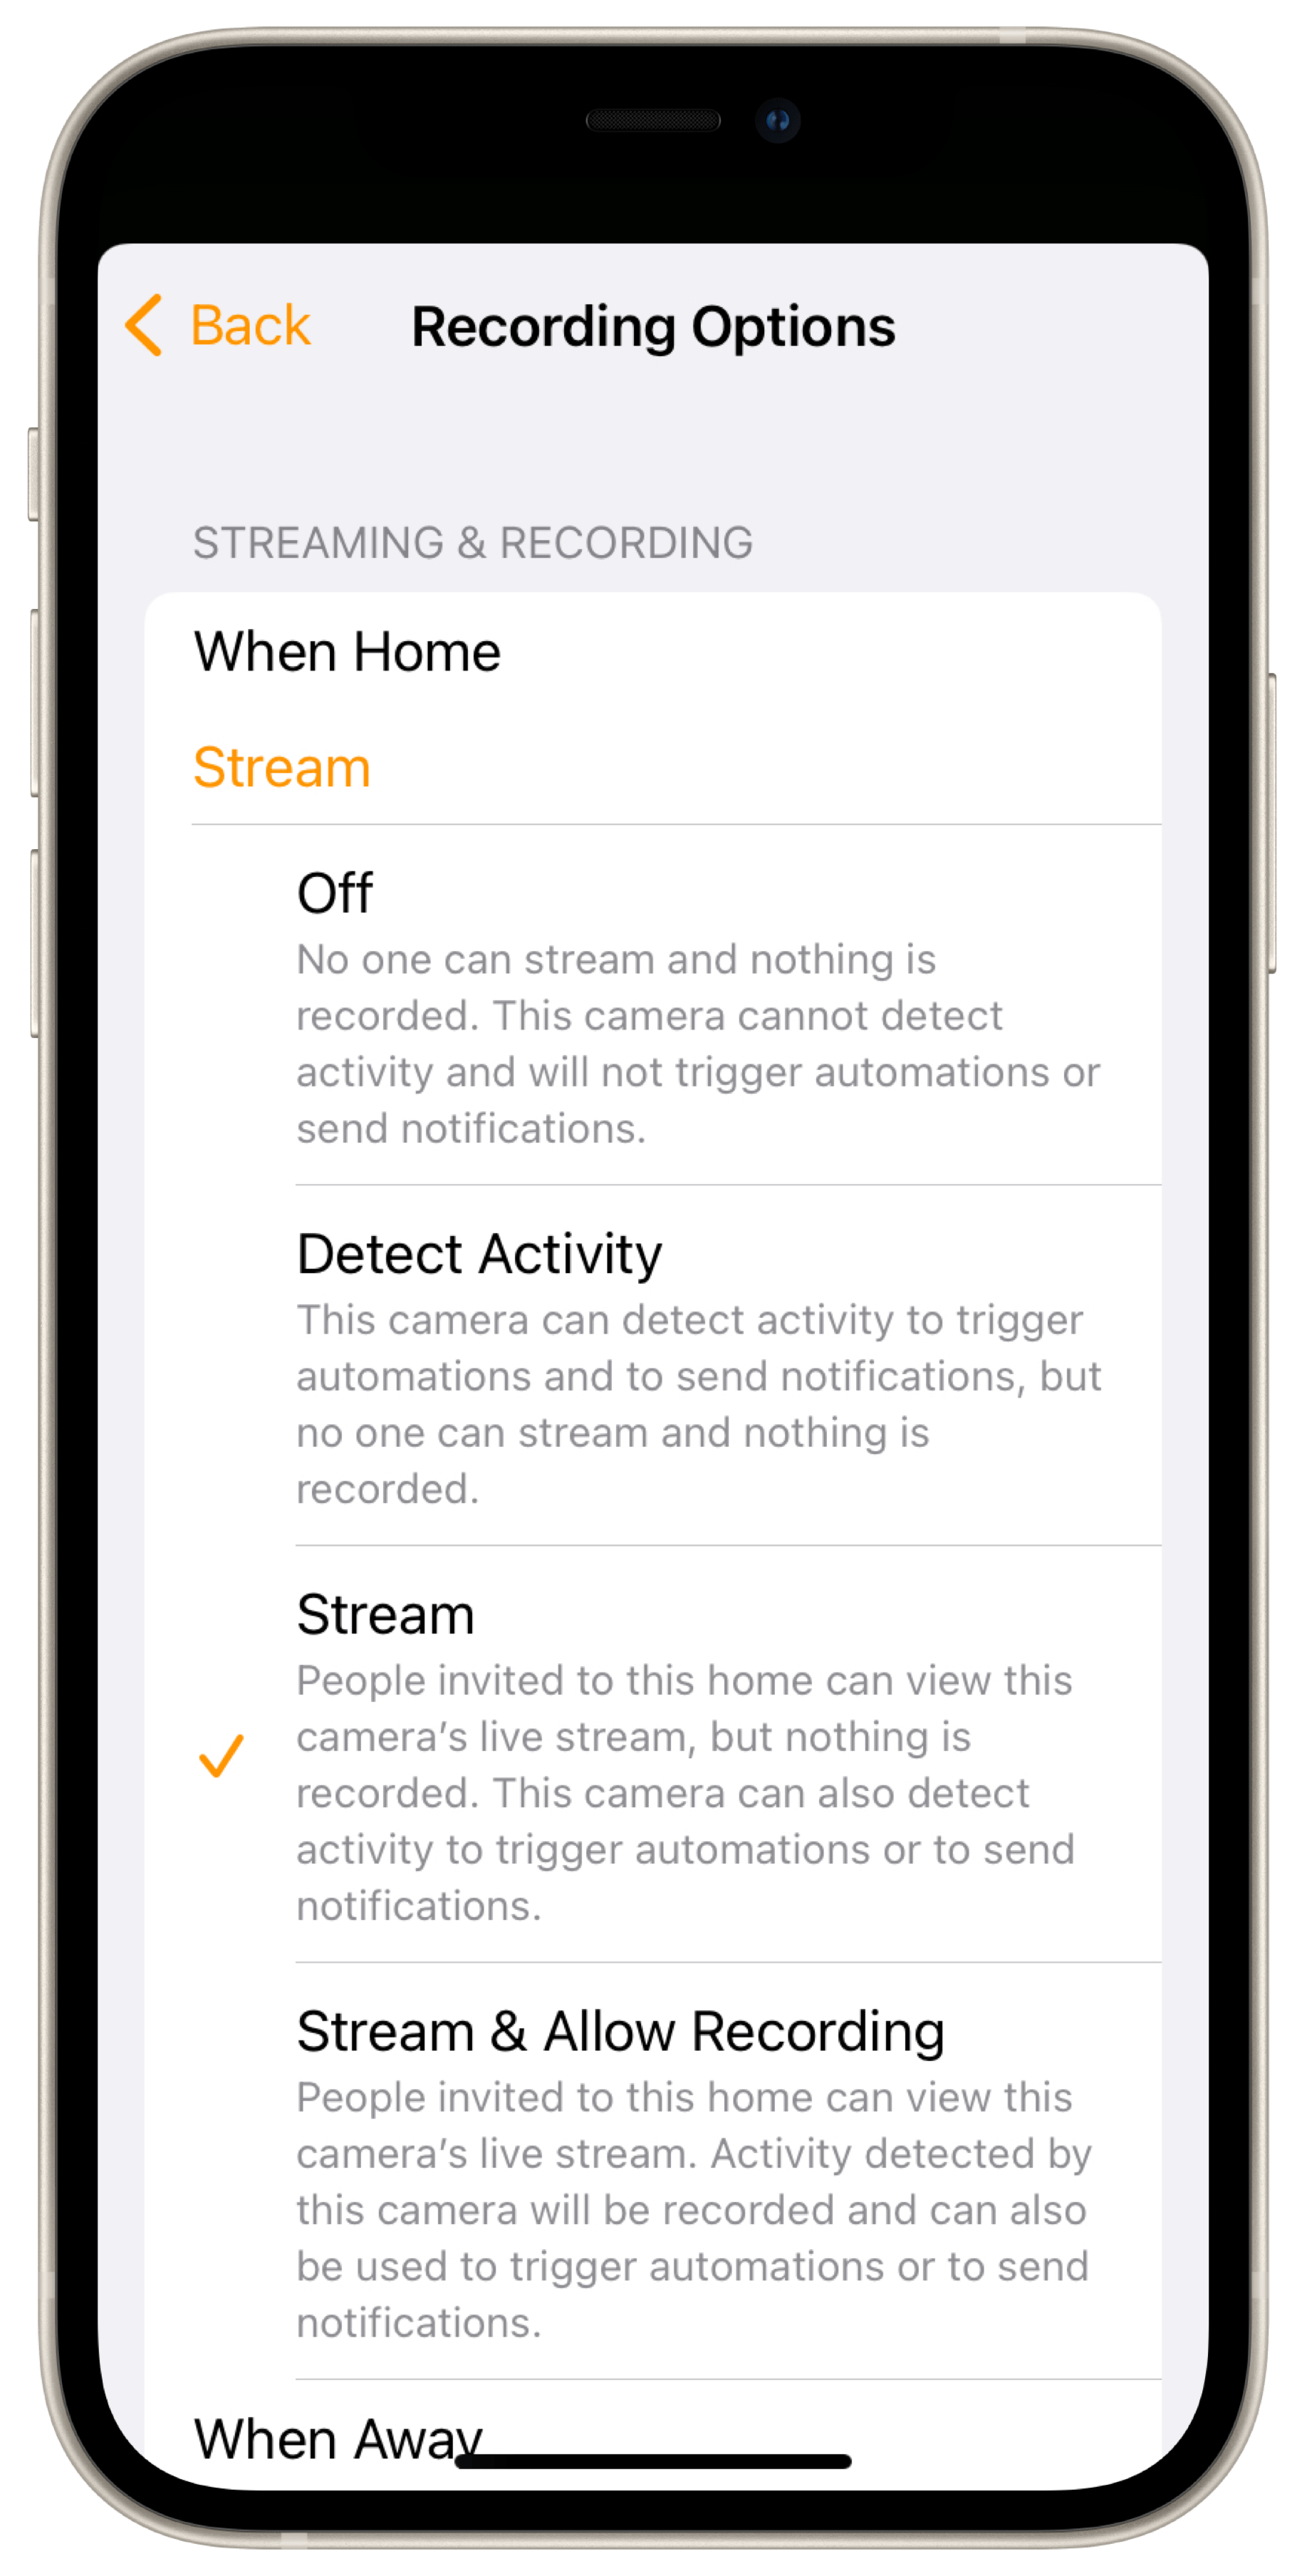
Launch the Eve app, open the settings, tap "Add Device" and scan the HomeKit setup code of your Eve Outdoor Cam (it's stuck on the wall plate and manual, please keep it safe). Once you’ve added your Eve Cam, you then configure the basic settings of the camera that HomeKit will associate with the location of your iPhone and the devices of the people you invite. Select the monitoring level for the options When Home and When Away:
Off: the camera can’t record, stream live images, send motion-detection notifications or trigger any automations. If people, animals or vehicles move within the field of view, the floodlight will remain off.
Detect activity: the camera detects motion and can activate the floodlight, trigger automations and send notifications based on this.
Stream: aside from automations and notifications, this mode also allows you and invited people to access the live stream.
Allow streaming & recording: the camera provides a live stream and can create recordings – either based on any motion that’s detected or motion that’s been caused by people, animals, packages and/or vehicles.
During setup, you can also configure whether invited household members can only view the live stream or also browse recordings.
Notification and recording settings
Next, you use the recording settings in the Home app to specify what type of motion should start a recording. You can open the camera settings from the live stream screen of the Home app, which you access by tapping the camera snapshot in the corresponding room view.
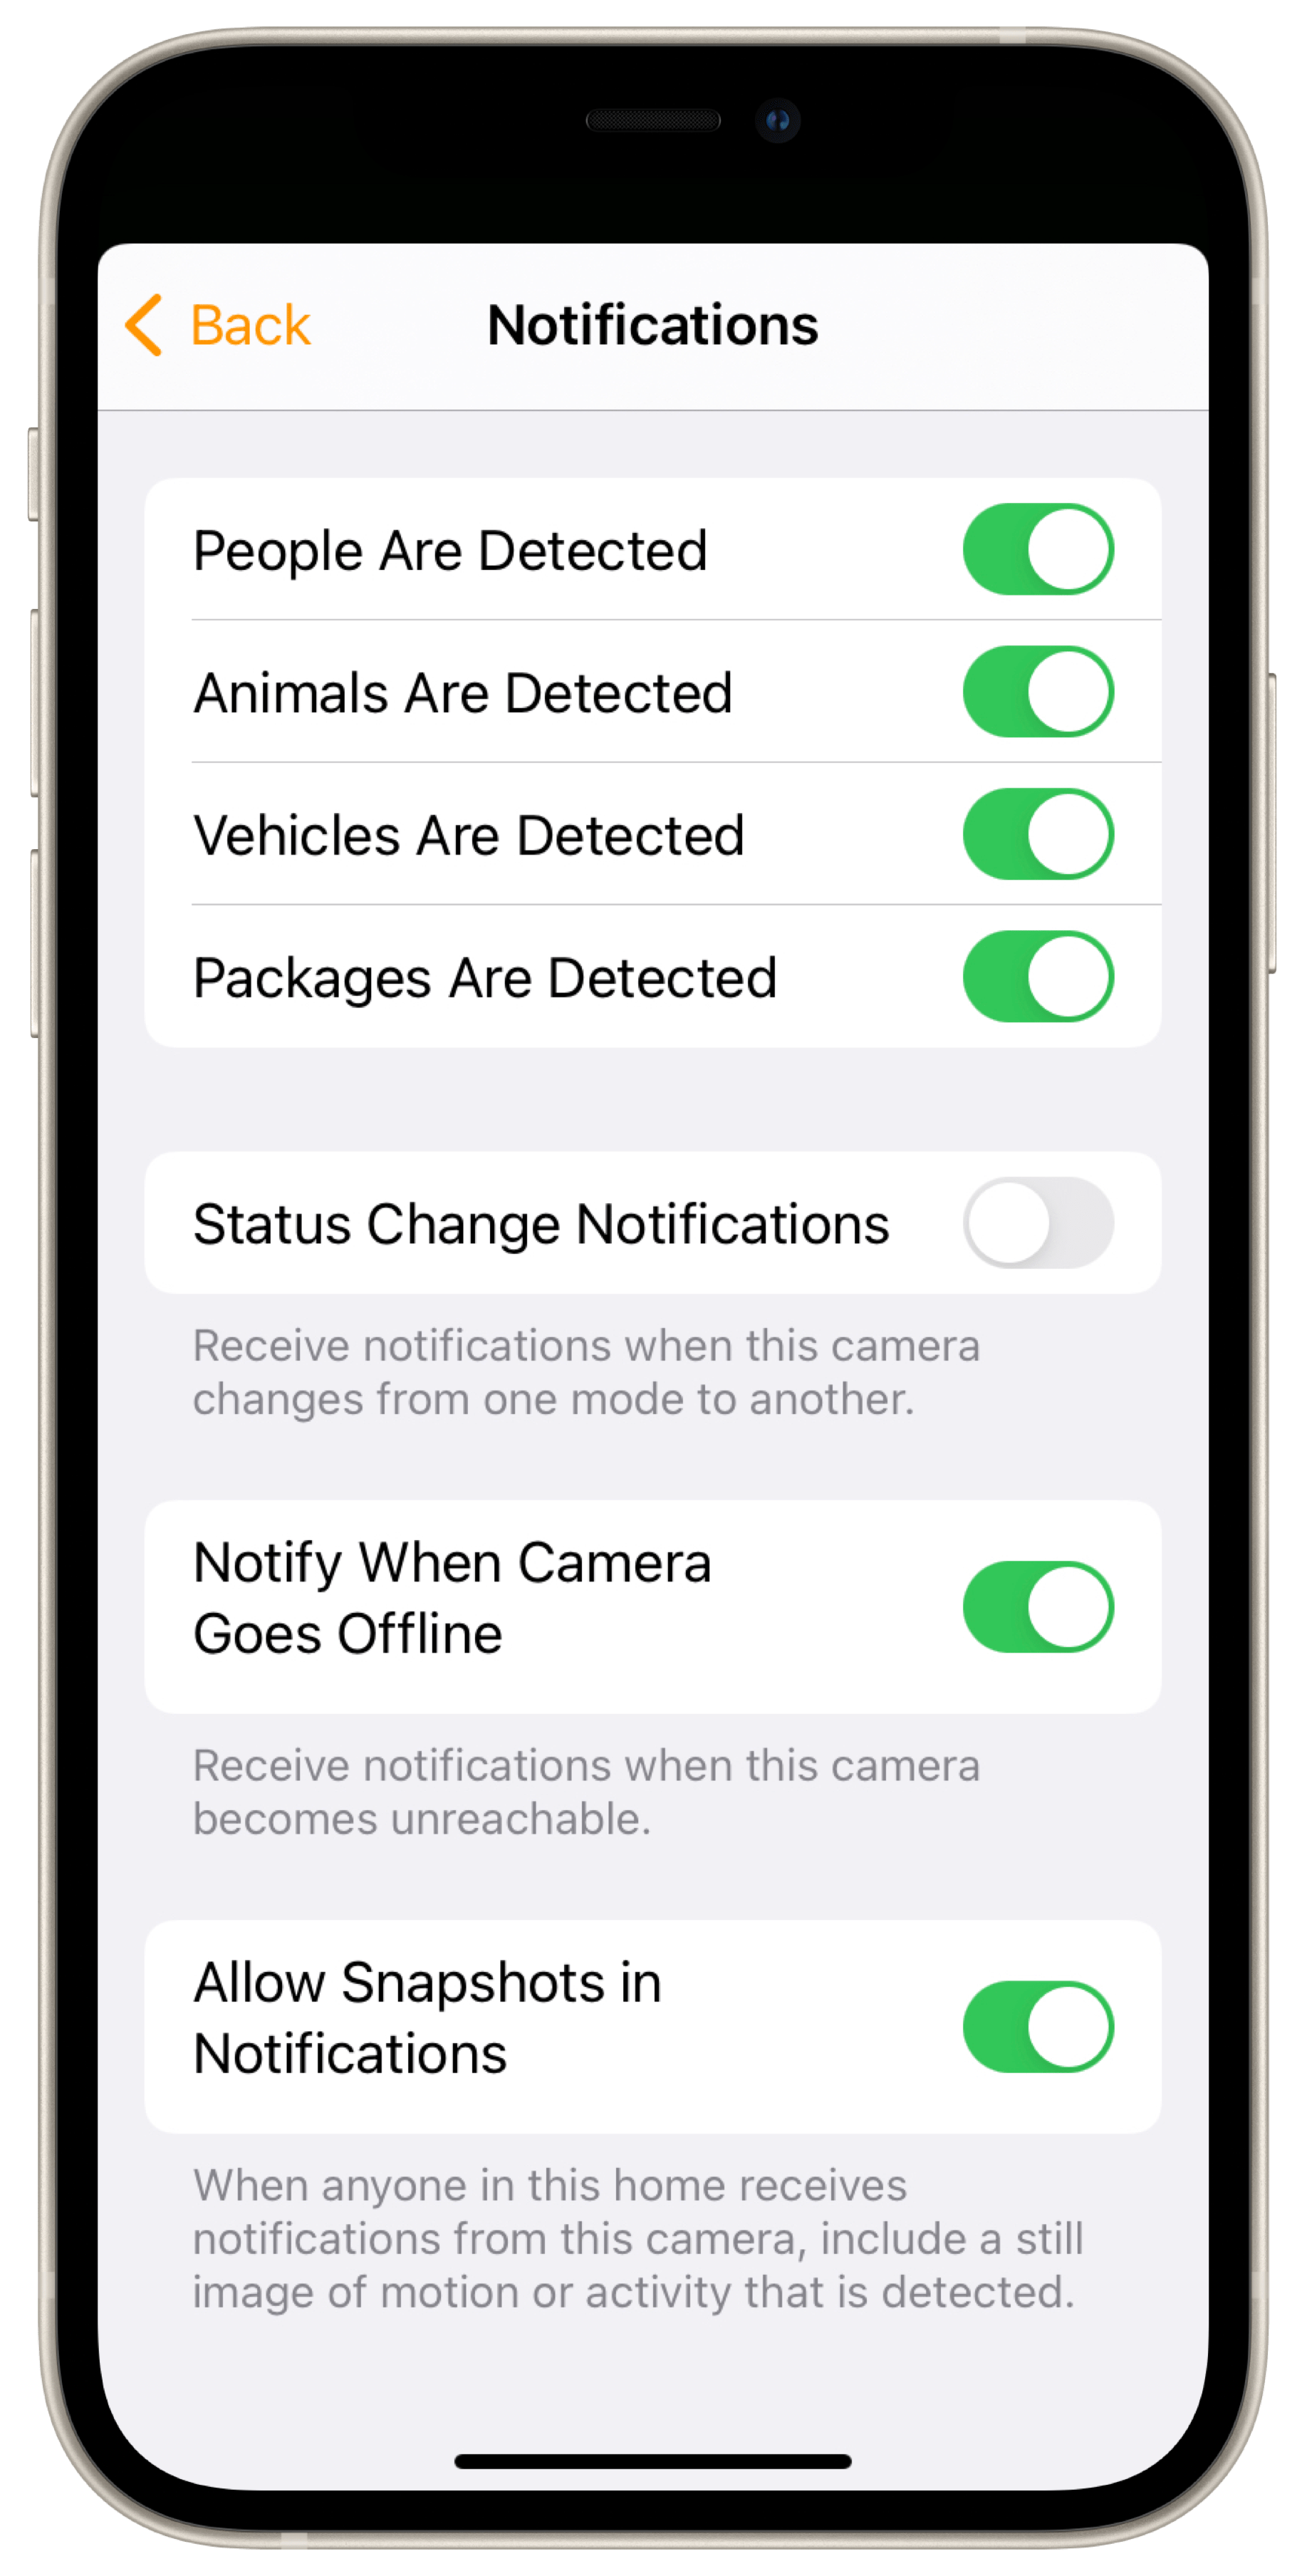
The Notifications options let you set what you want the camera to alert you about. Everyone in your household can customize them to suit. You can choose whether you want to receive notifications together with a snapshot or just text. If you want to know at any time if the camera is armed or disarmed, enable the notifications about status changes and to let you know if the camera is no longer accessible.
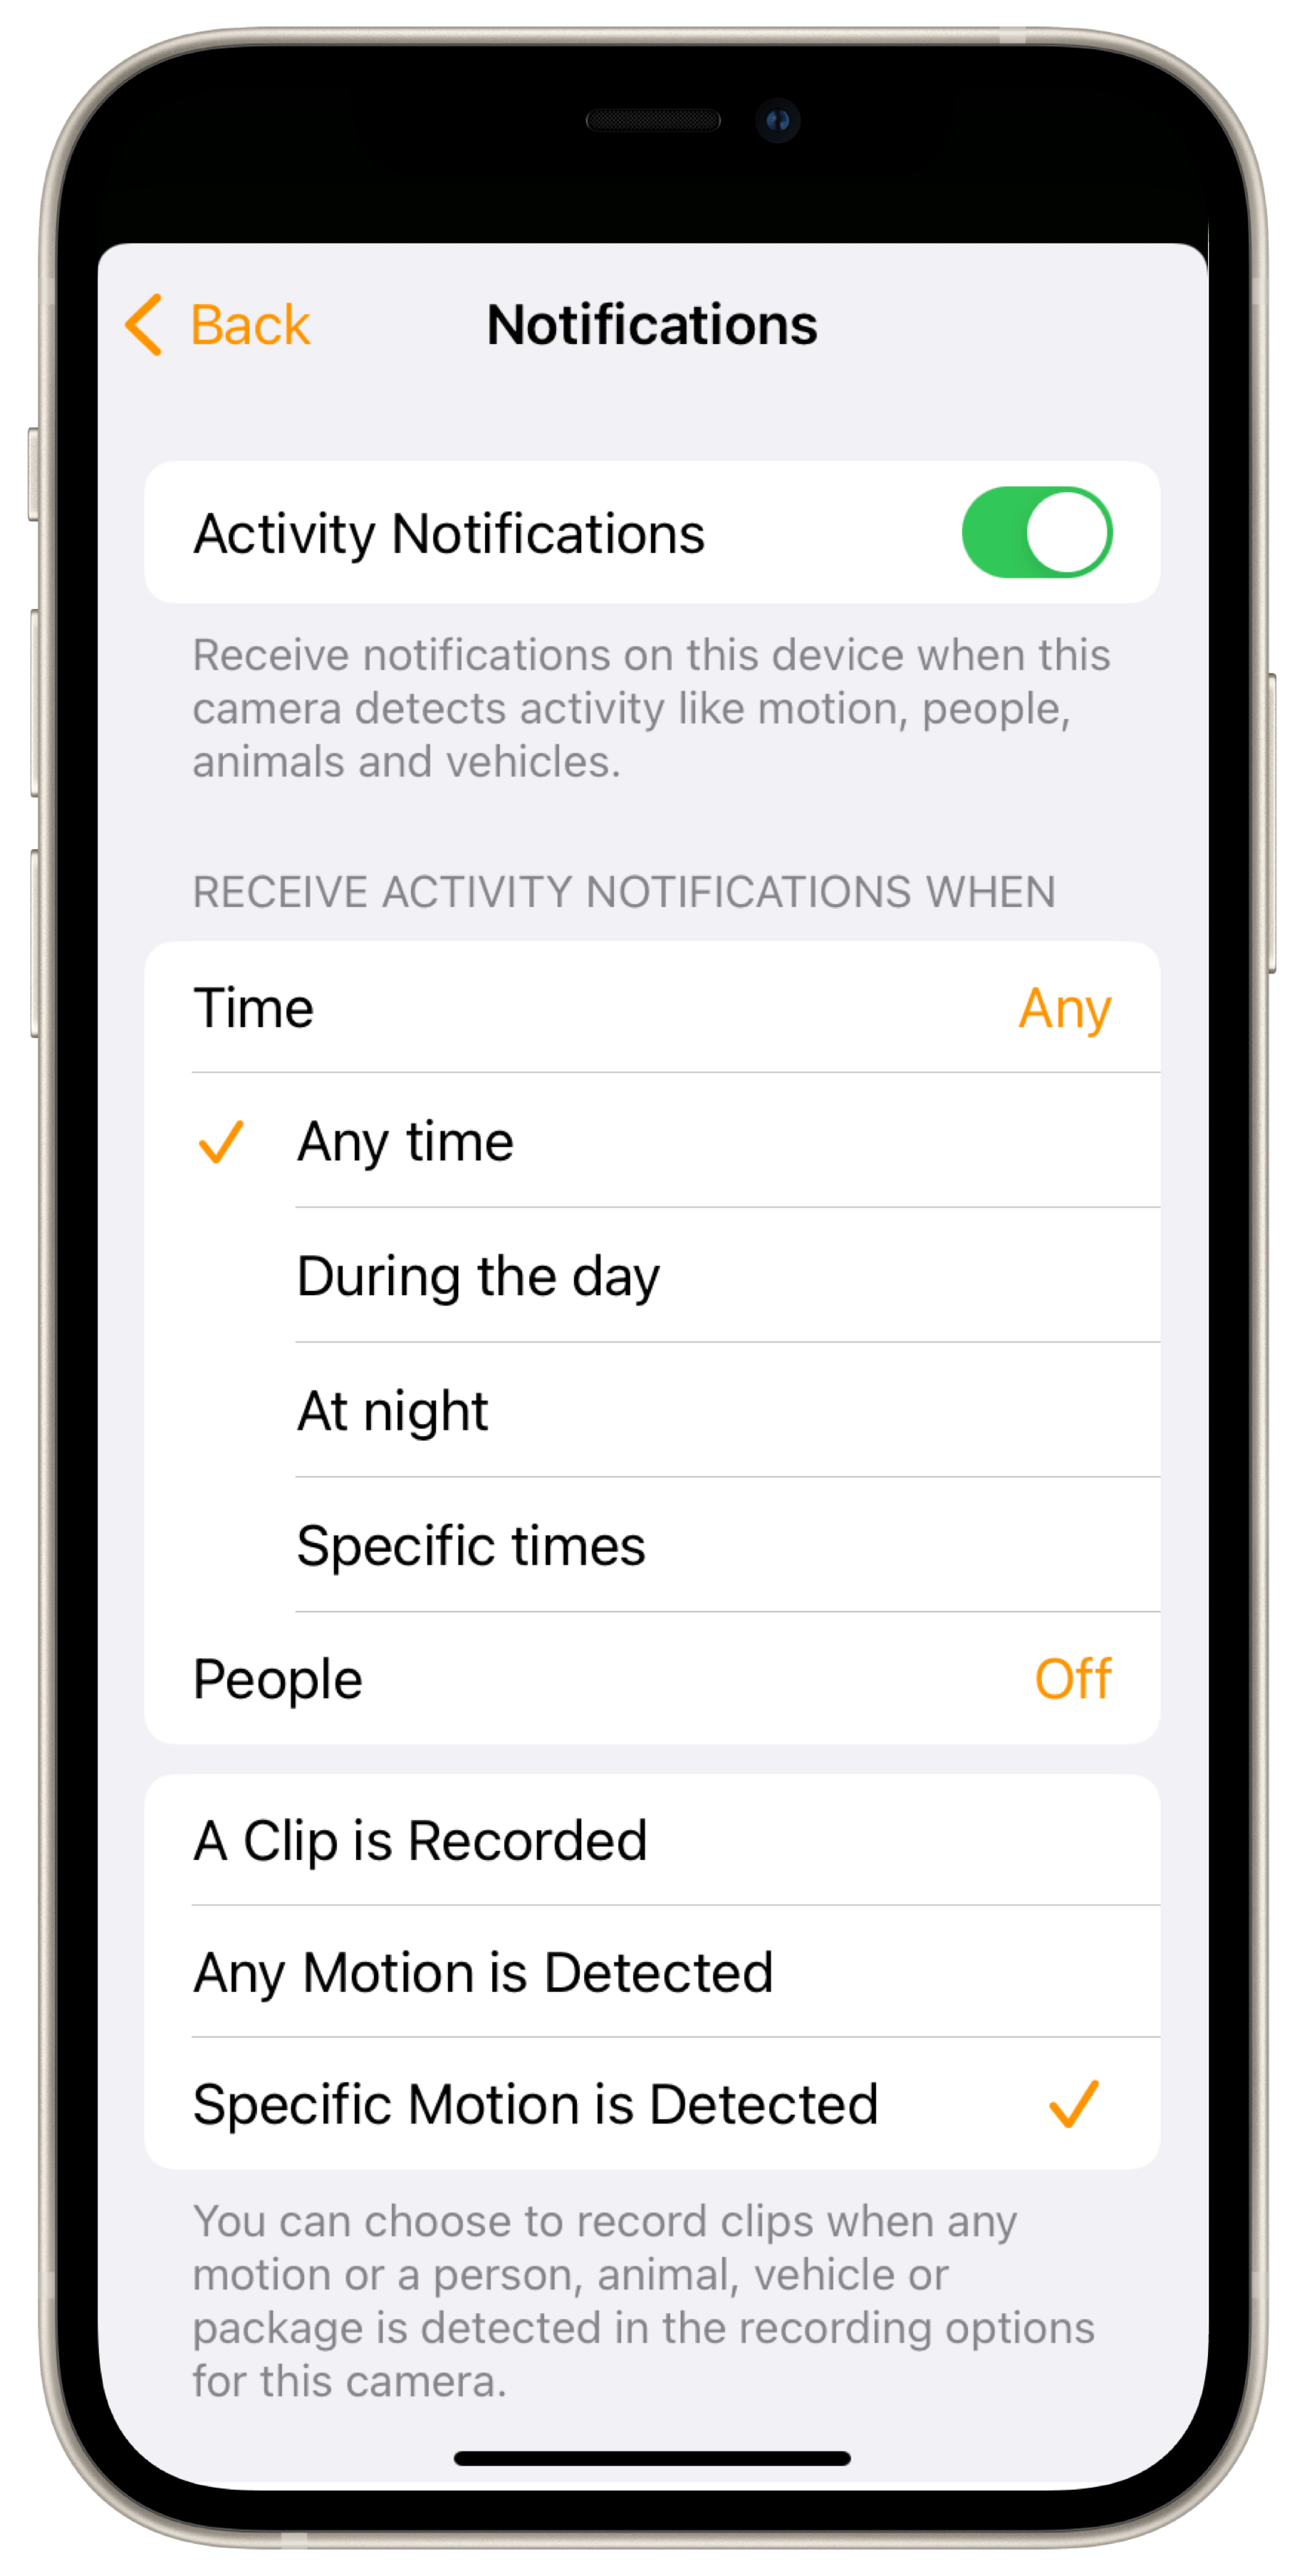
A really great feature that can be customized to suit your security requirements is the option Activity Notifications. You can restrict the option based on time and location conditions, so HomeKit only provides notifications about activities "At night" or "When nobody is home". You can also set whether you want any motion to trigger a notification or only specific ones (people, animals, etc.) or only activities selected within the recording settings (see below).

The Streaming & Recording settings section is where you find the basic settings you configured during setup (see above). If you want, you can customise those options here. Tap "Other options" to configure which motion events you want to trigger recording, i.e. any activity or only that of people, animals, packages or vehicles. You can also configure whether you want audio to be recorded alongside the video.
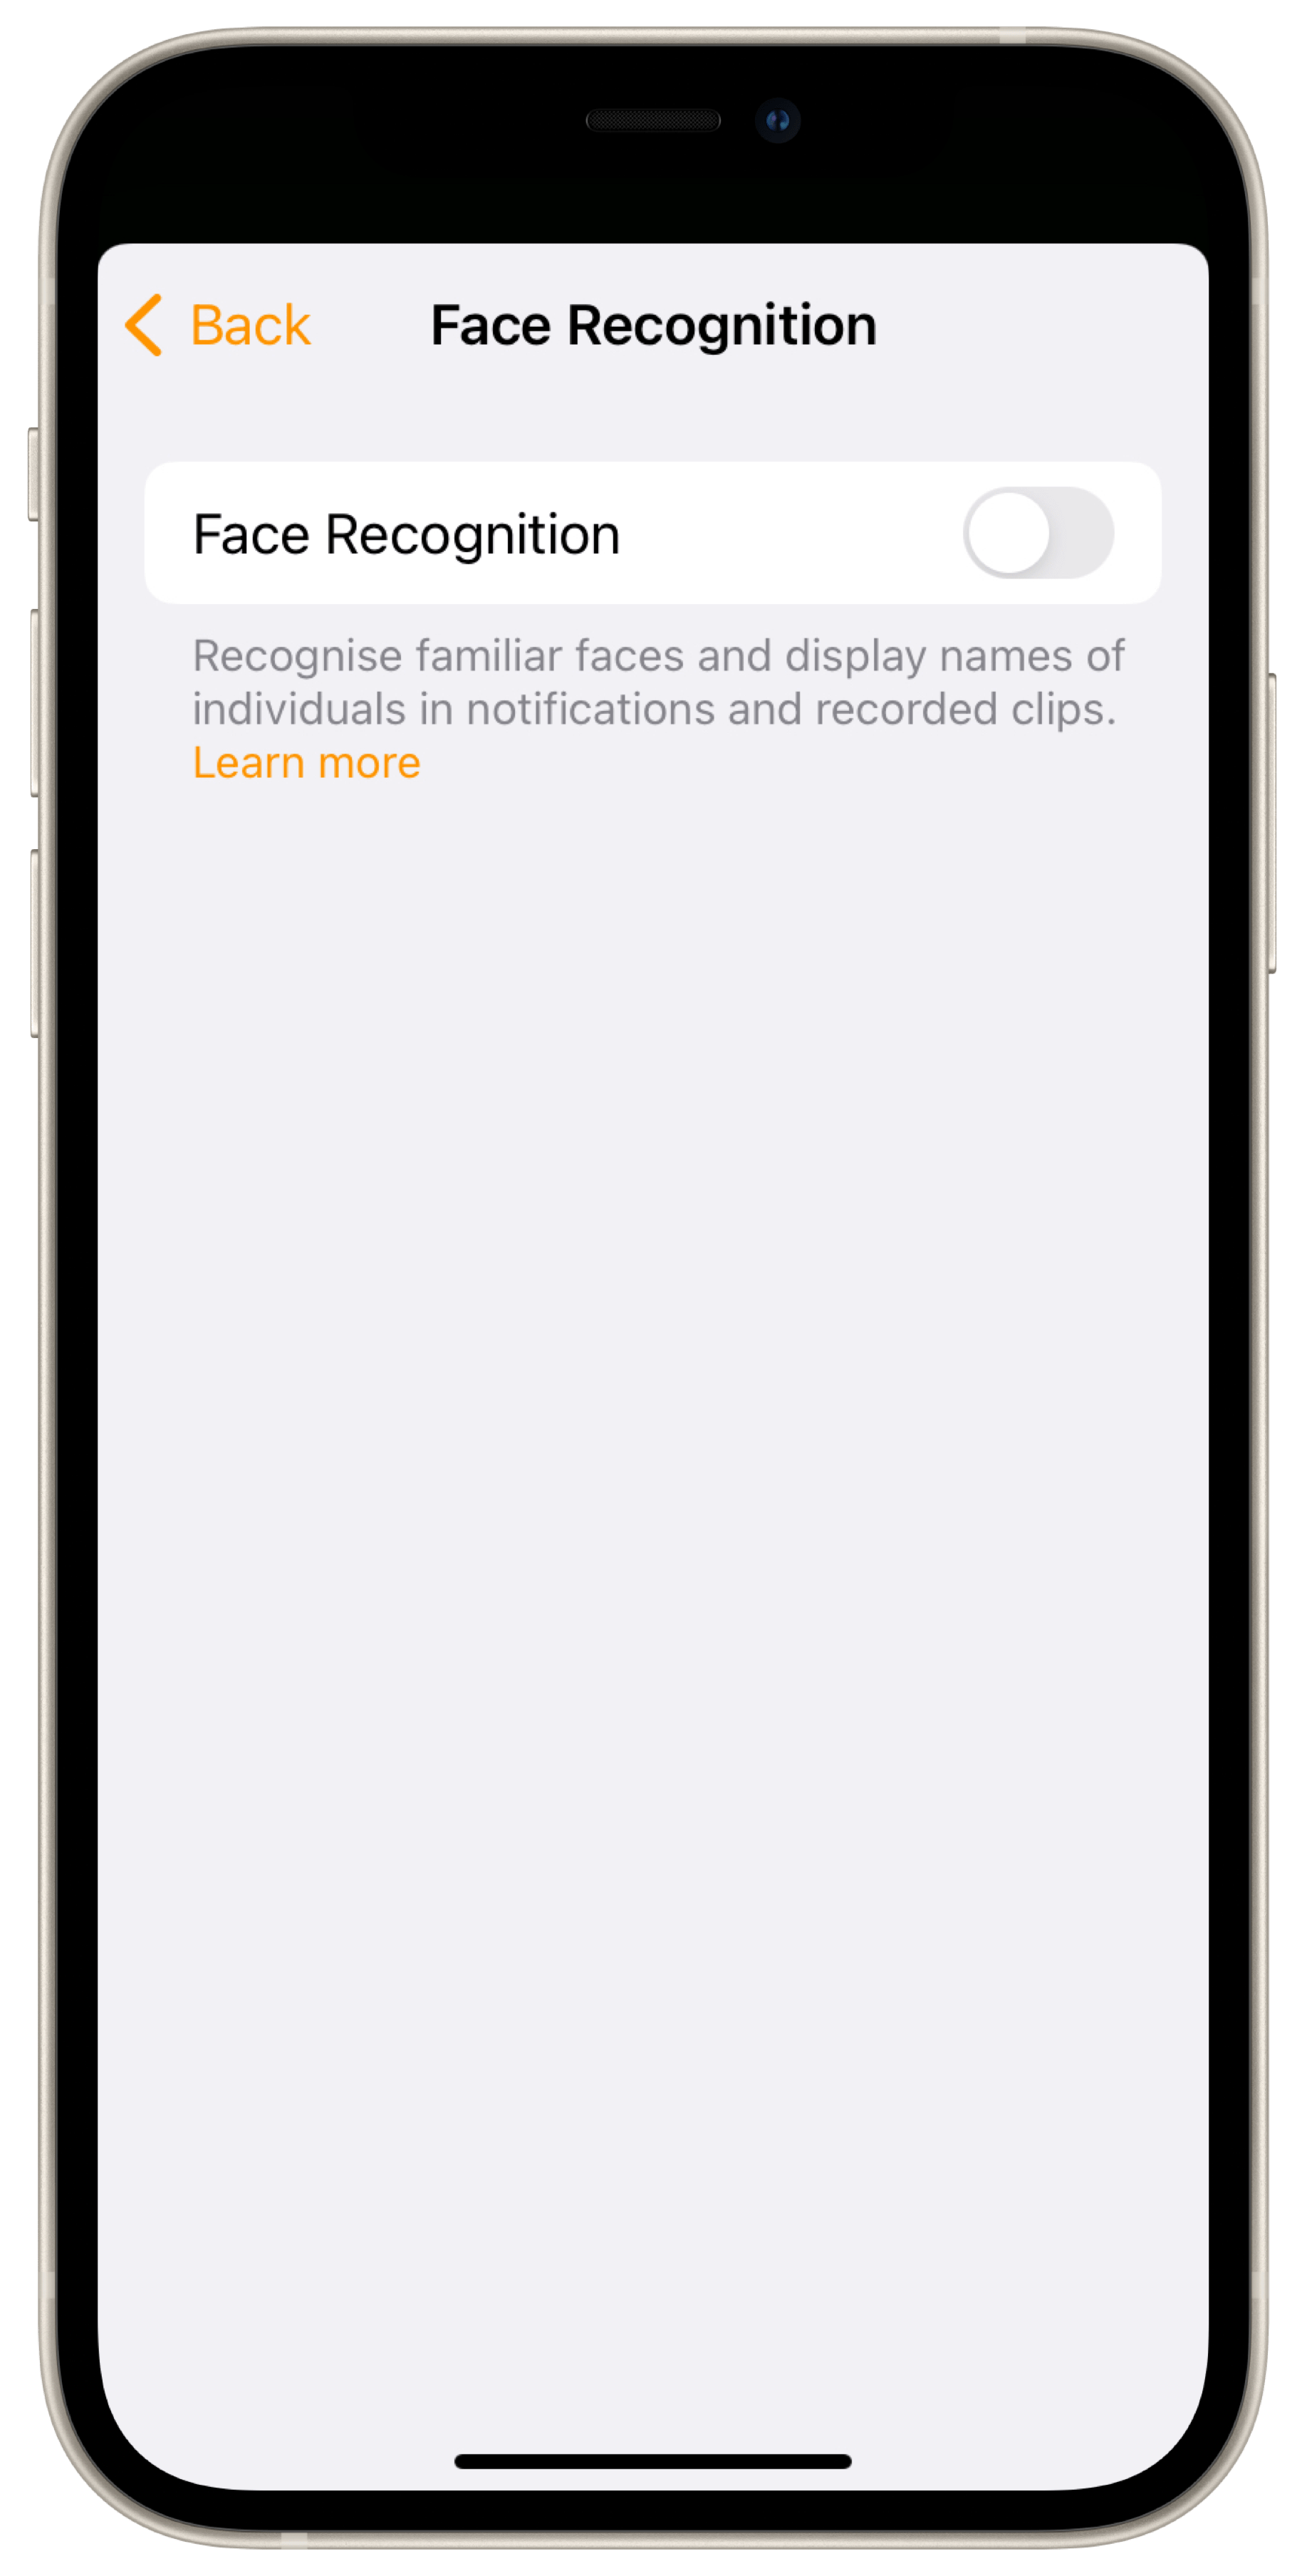
Eve Outdoor Cam provides facial recognition based on the AI features of HomeKit Secure Video. This allows notifications of detected motion to provide specific information about who is currently moving in the camera's field of view. Names can be manually assigned in the Home app to faces in recorded clips. In addition, you can share your photo library or the directory of people with yourself or others in the household. Notifications can be hidden from specific people.
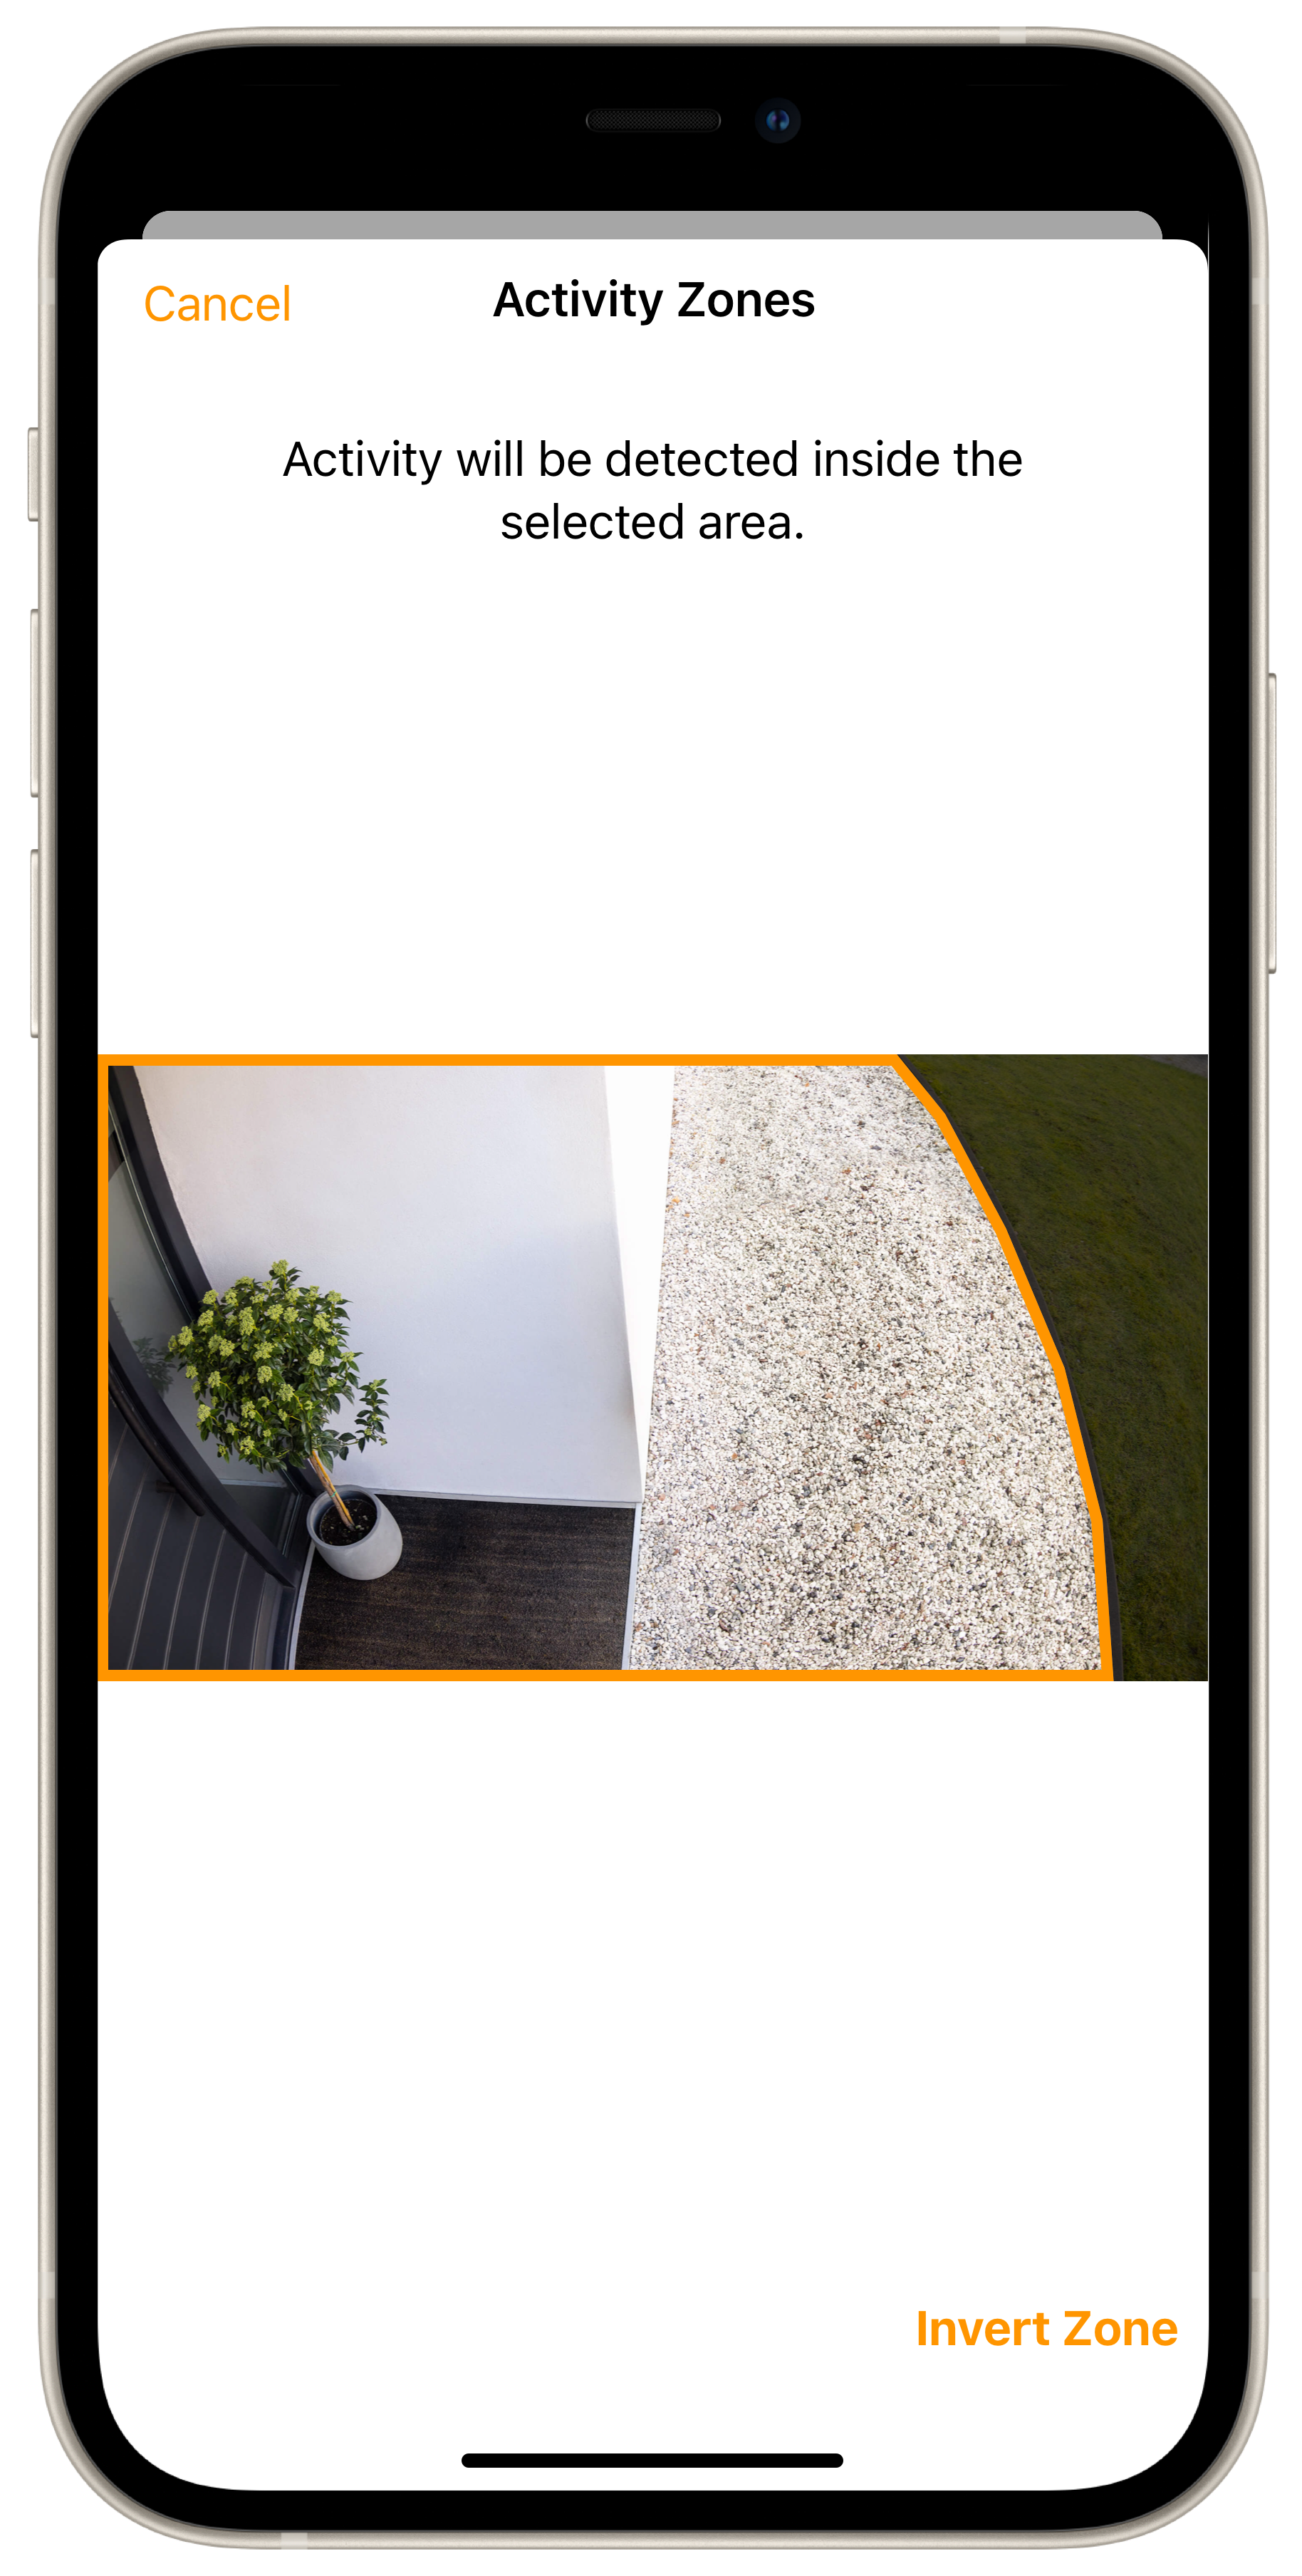
The Activity Zones feature helps optimise the relevance of notifications about detected motion. In just a few taps, you can define one or more areas you want your home hub to focus on when recognising an image once the motion sensor has been triggered. Depending on what is easier to isolate, you can also define the irrelevant zone and then invert it.
Tip: regardless of whether and where you create an activity zone – Eve Outdoor Cam will continue to record the entire captured image. The activity zone is merely excluded from the AI analysis. This means activity zones are not a way of "hiding" parts of public space from monitoring.
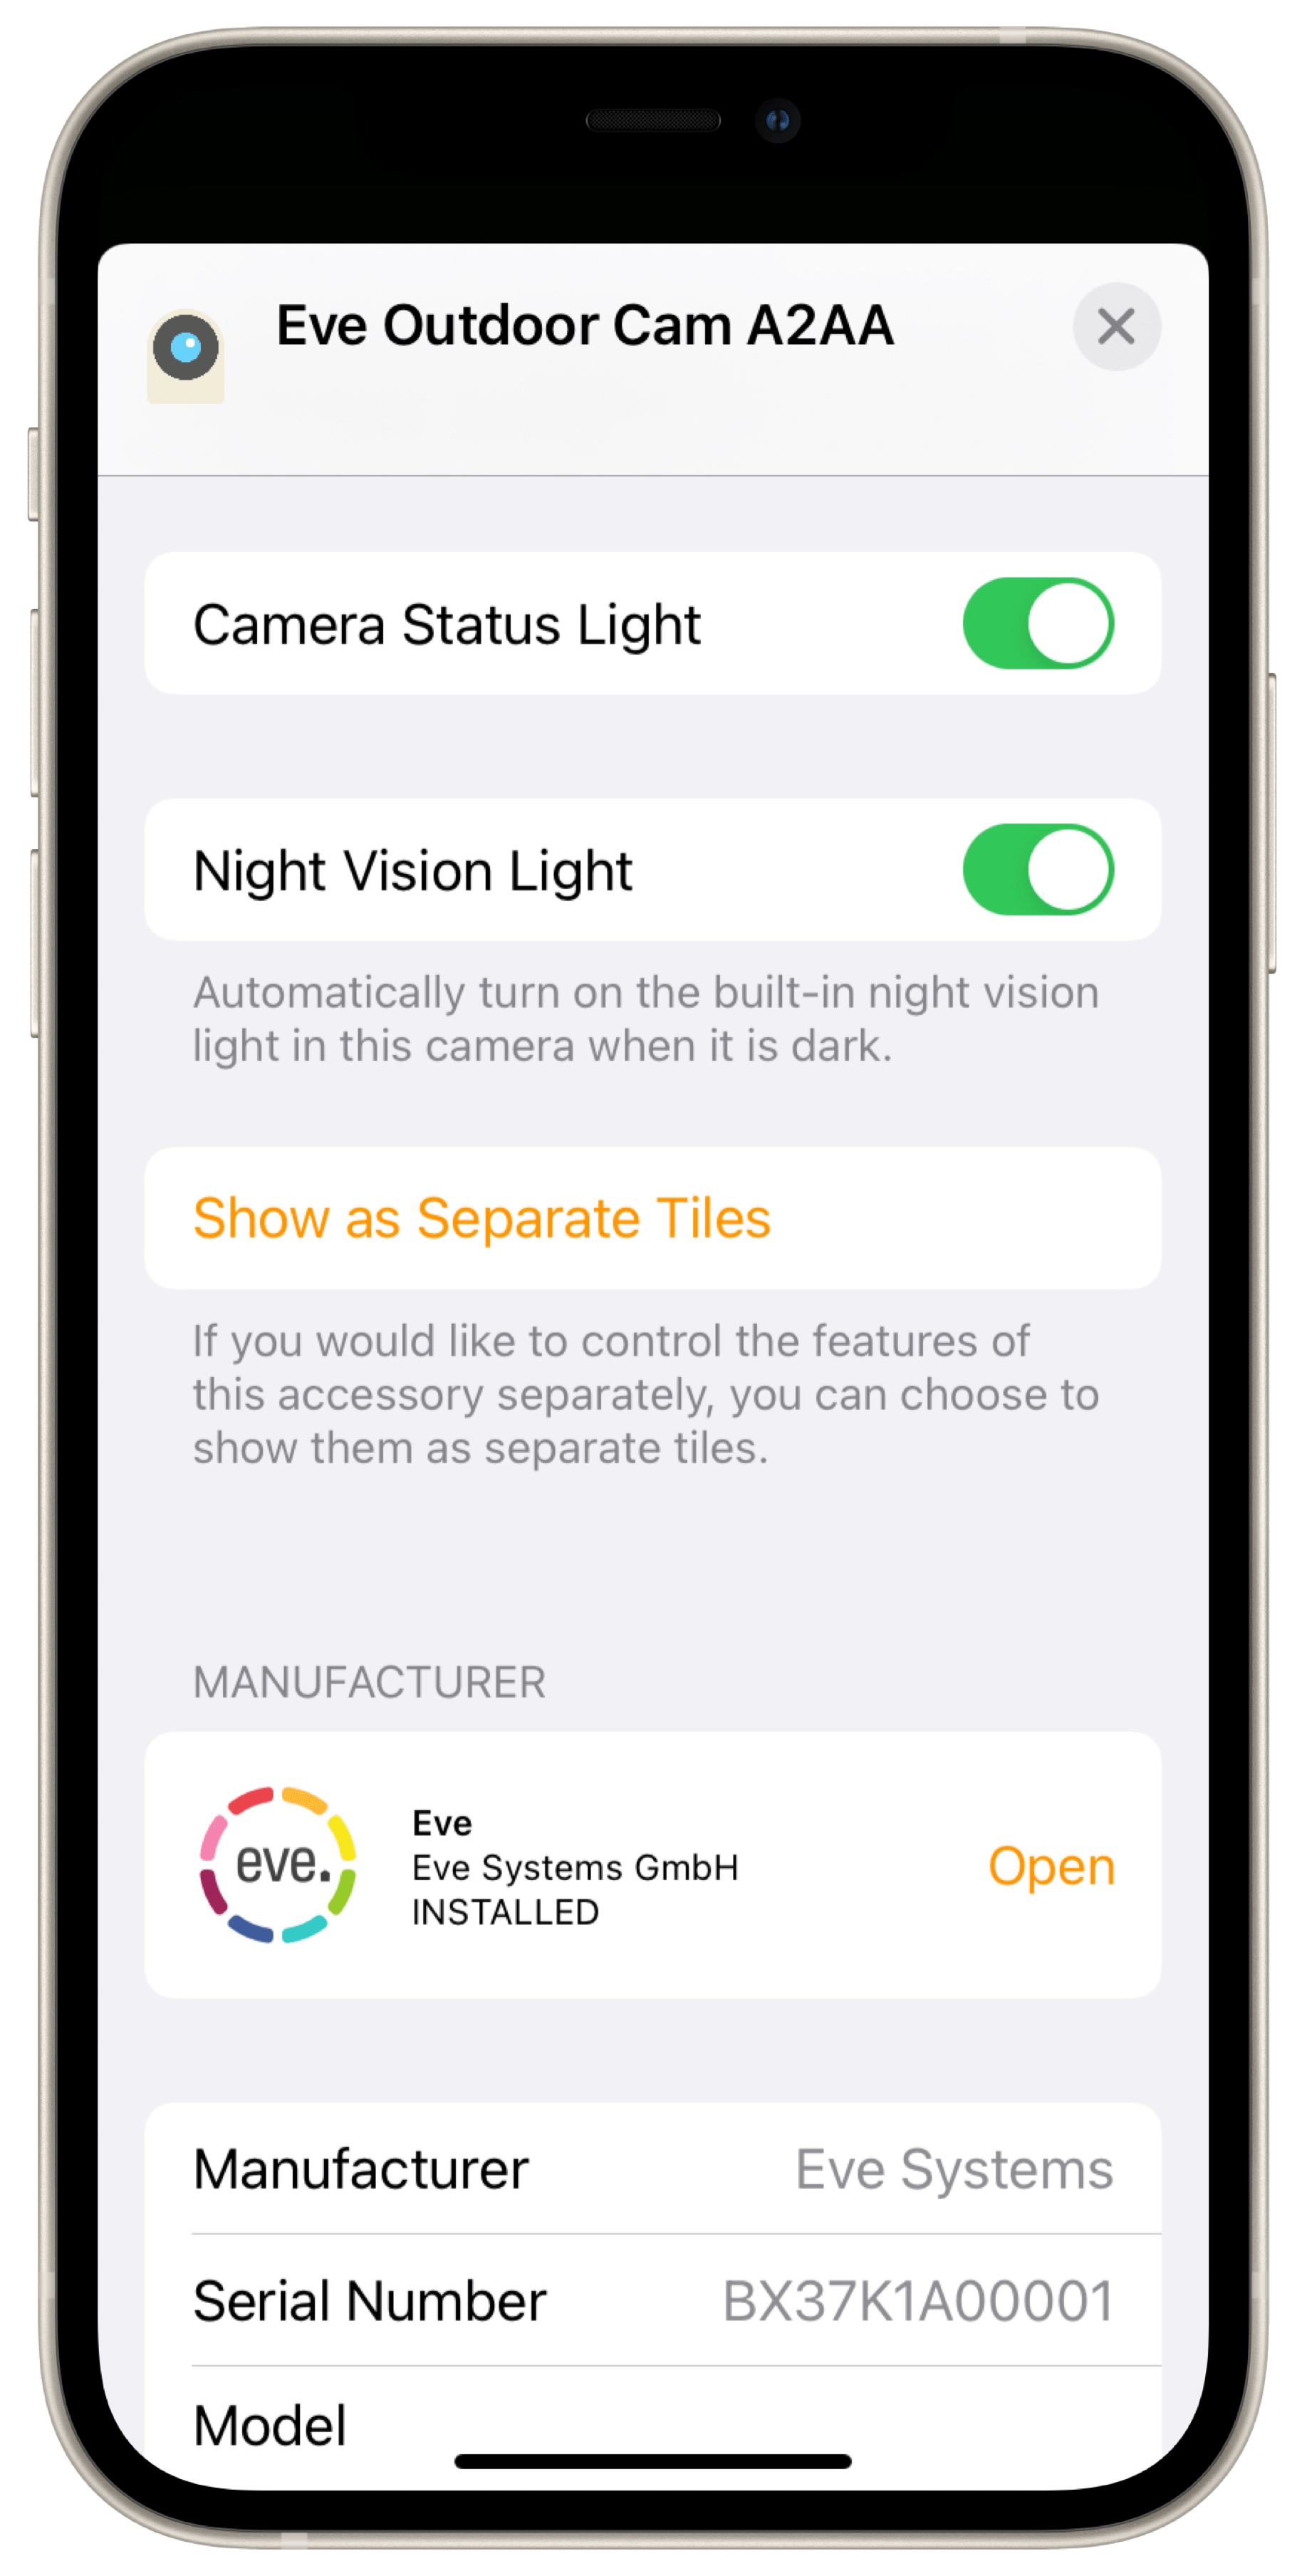
The last two options concern status LED and night vision illumination. If you disable the status light, nobody in the room will be able to tell what the status of the camera is. They also won't know if they're being filmed. Likewise, you can also disable the night vision lighting from turning on automatically when it gets dark. Tip: this setting has no effect on motion detection, which also works in complete darkness.
Tip: if you want to configure who can access the recordings, in the Home app tap the home icon on the top left then go to Home Settings... > Home Name > People. Now tap the entry for the person and then in the "Allow Access to Cameras" section choose between the options "Stream only" and "Streaming & Recording".
Live screen and recordings
HomeKit Secure Video stores recordings in encrypted form and they can only be played back on an authorised device or player. If there are recordings in the ten-day storage, Home displays a timeline with thumbnails on the live screen. If you tap on it, a calendar also appears, which you can use to quickly call up the activities of a specific day. Tapping on "Live" hides the calendar again. Home enriches the recording thumbnails with icons that show you at a glance what type of activity (people, animals, etc.) was captured.
If Eve Outdoor Cam has recorded people, Home even shows their names – provided the facial recognition was active and successful. You can share a tap-selected recording via the corresponding icon displayed on the left above the timeline. The usual options are available – whether AirDrop, the photos and messaging apps or the linked storage locations. Tip: Home provides shared recordings as unencrypted .mp4 files. This way they're playable outside of your HomeKit Secure Video infrastructure and that of your invited fellow users.
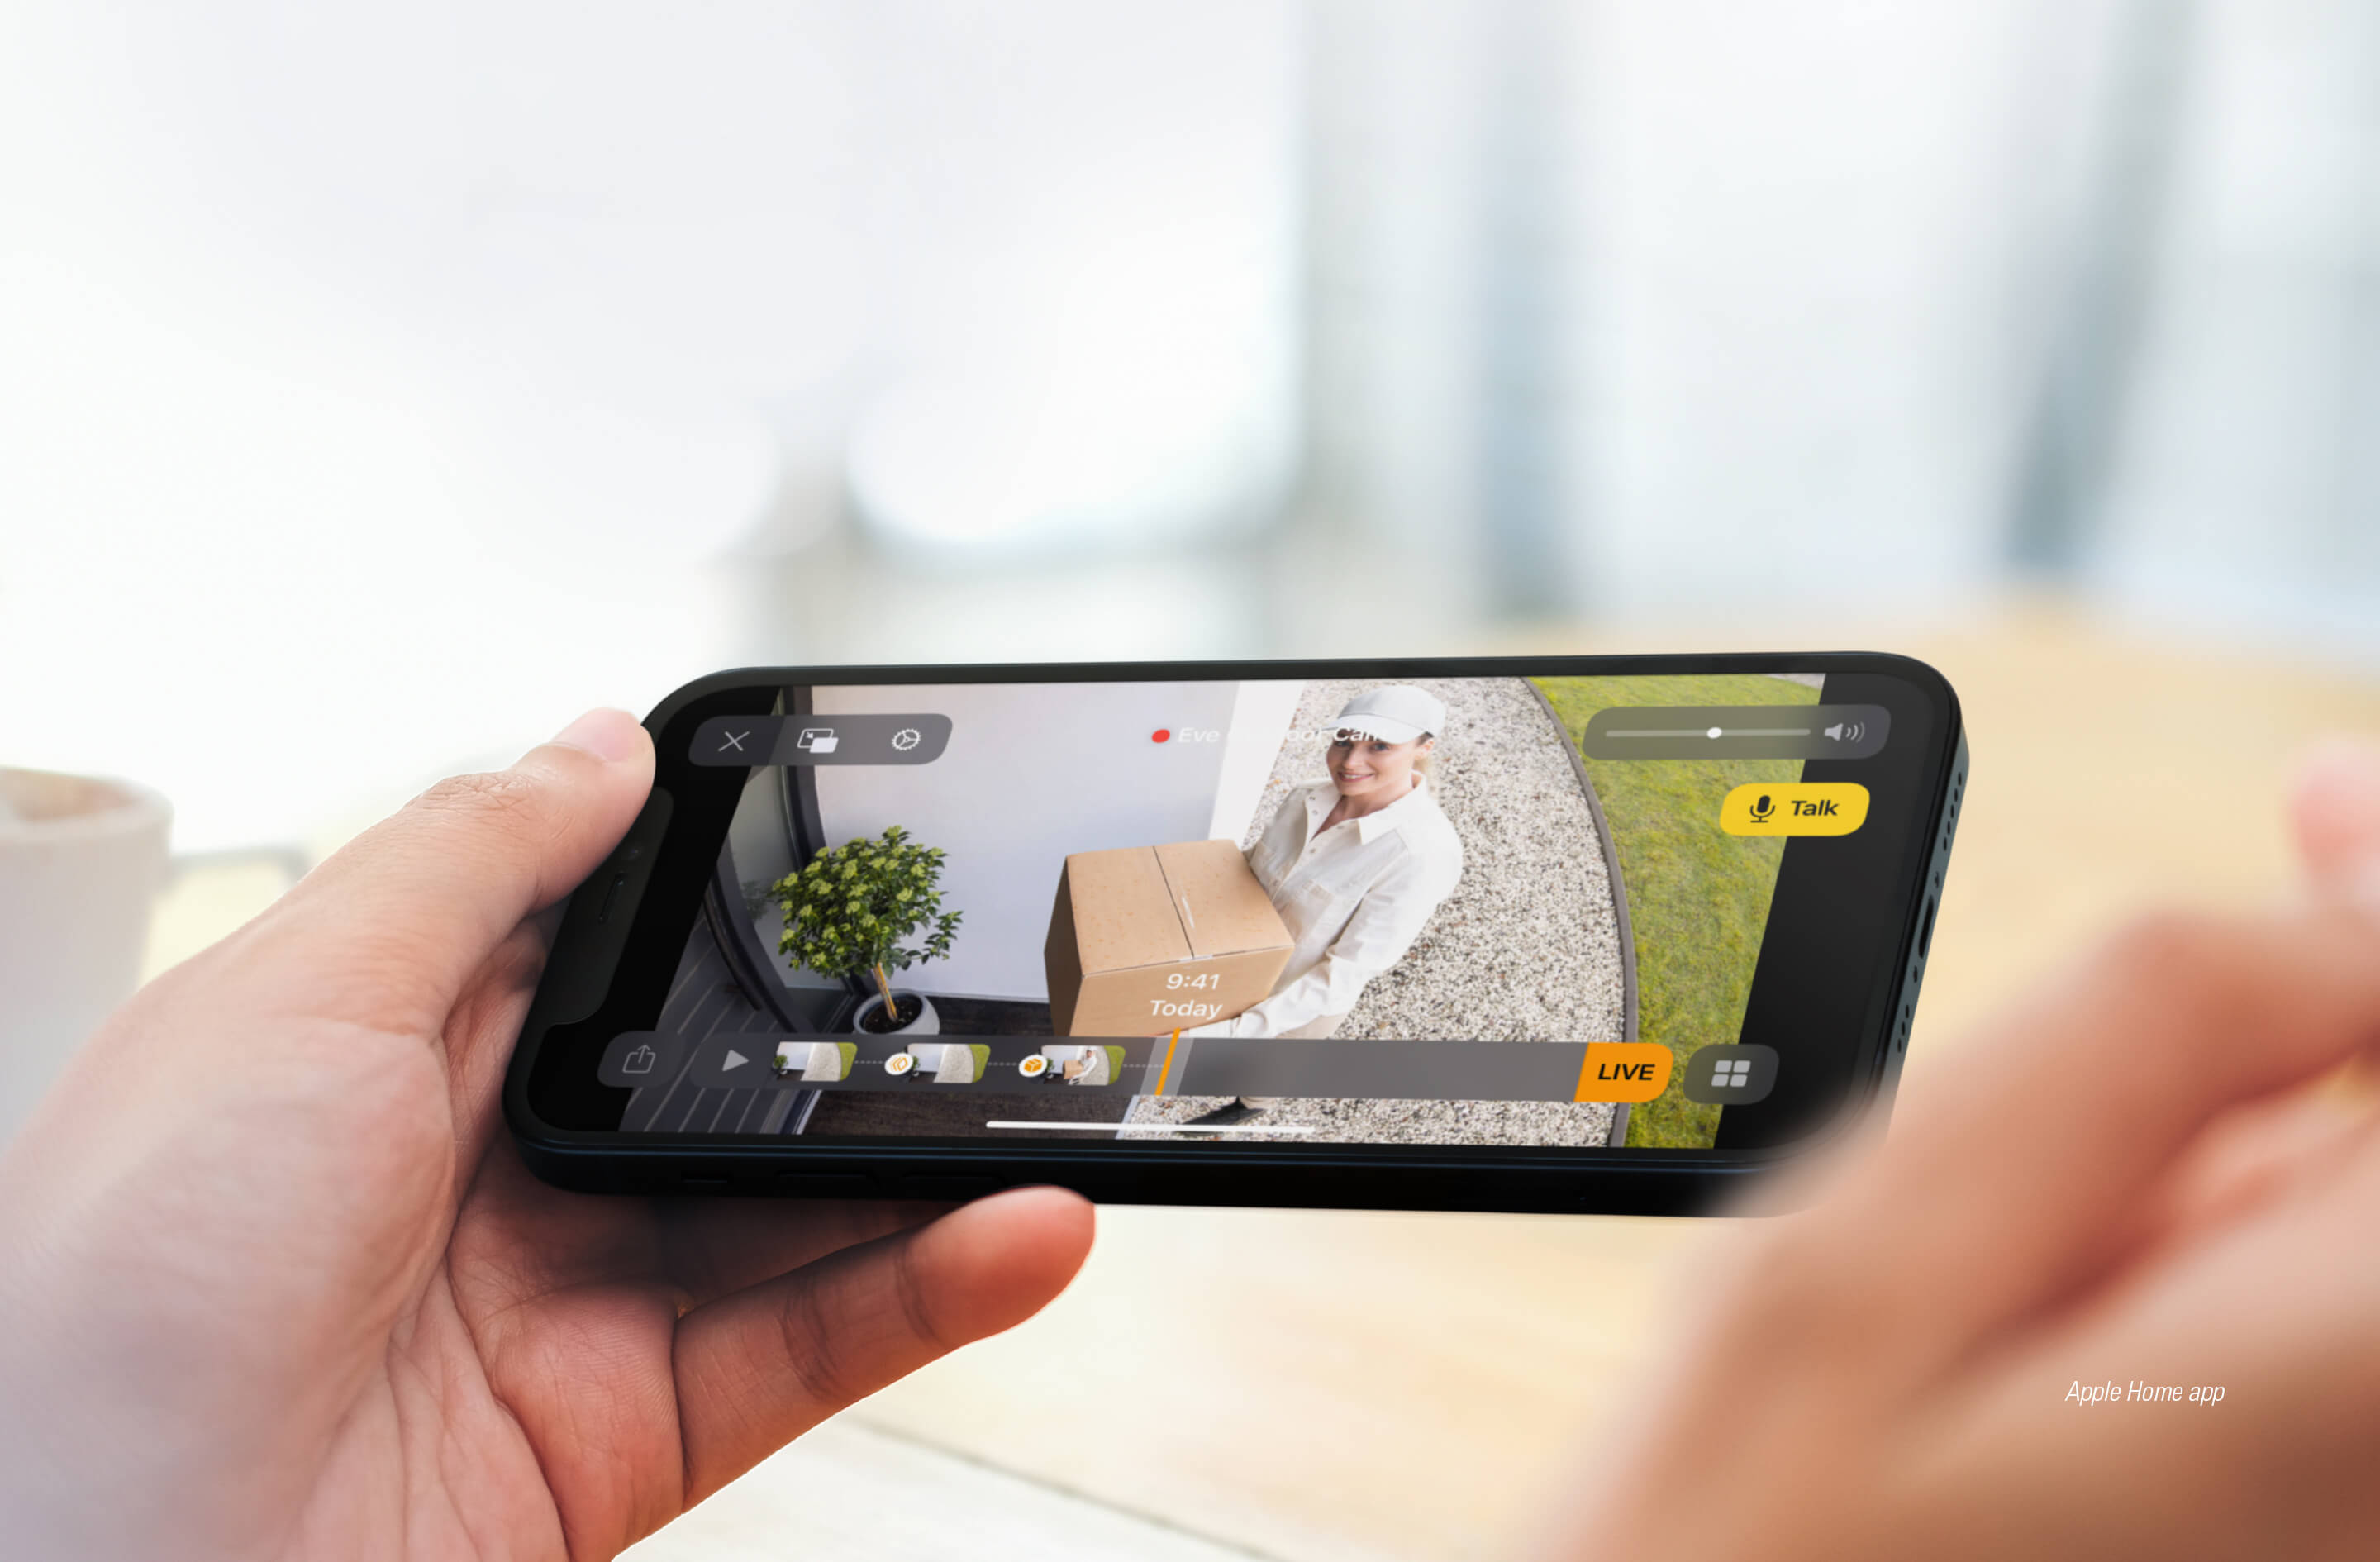
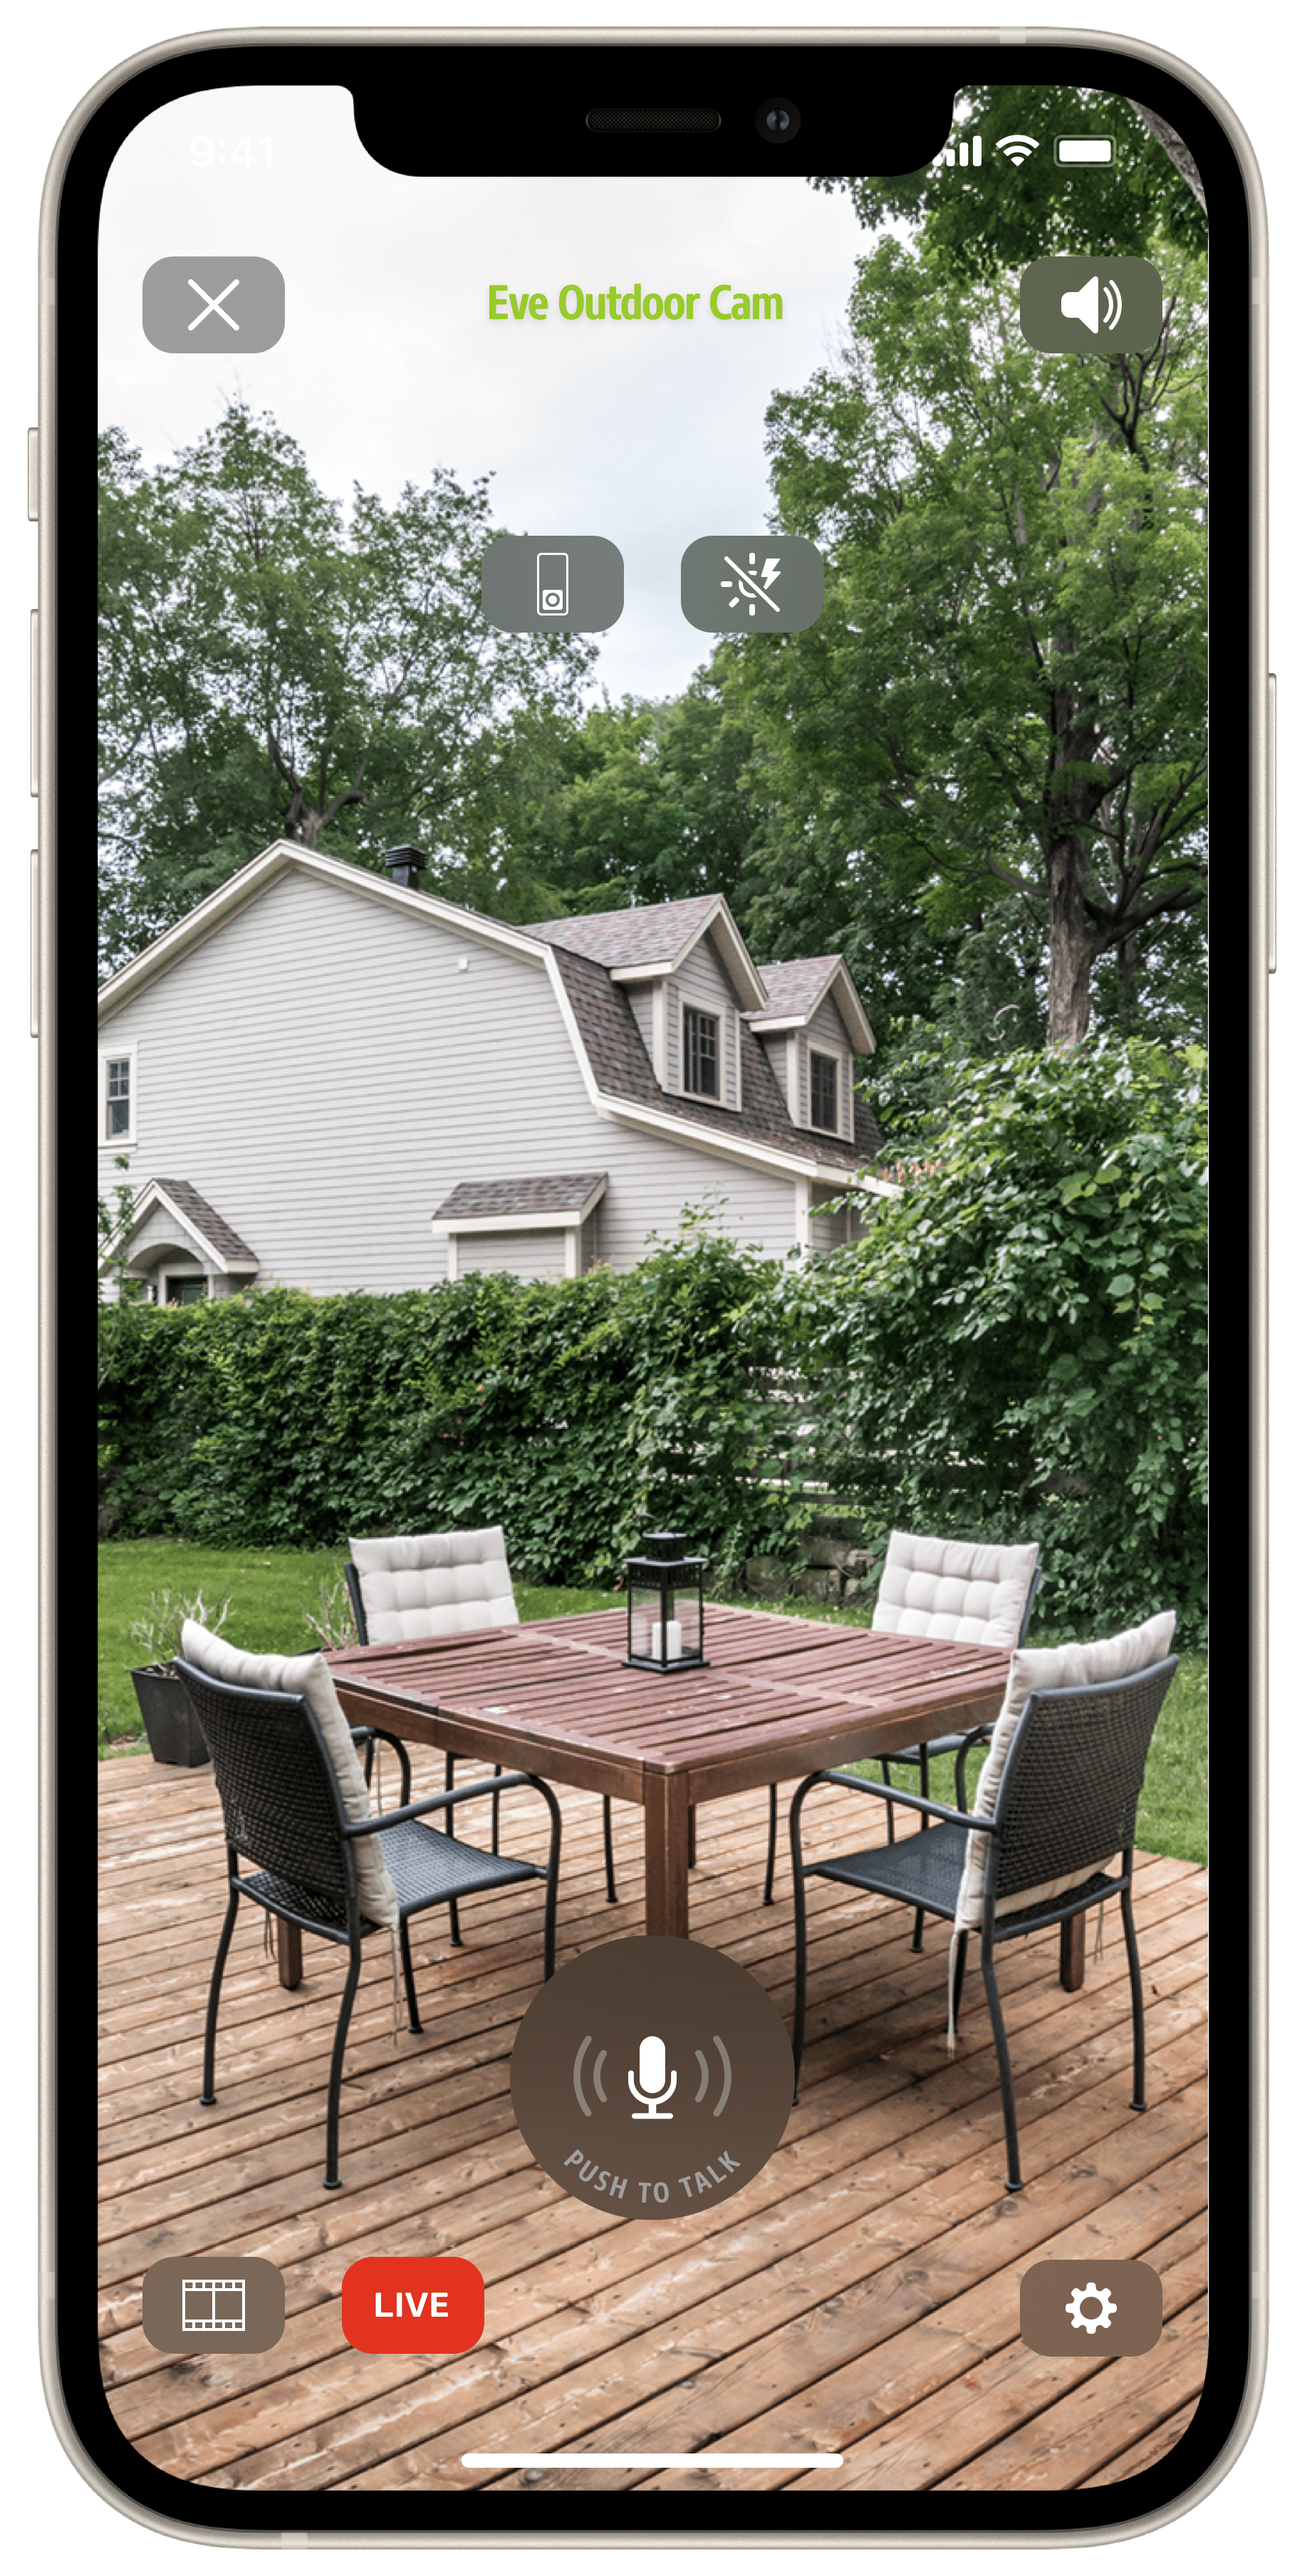
Other live screen controls include the picture-in-picture button that floats the video in the foreground, the buttons for settings, for adjusting the volume of the camera microphone, for controlling nearby devices, and for sending a voice message (tap and tap again to activate and deactivate the microphone).
Tip: your Apple TV can also be used as a player for cameras with HomeKit Secure Video. More details at: https://support.apple.com/de-de/guide/icloud/mm7c90d21583/icloud
Additional features and settings
While the Home app manages the features provided by HomeKit Secure Video, the Eve app, in conjunction with Eve Outdoor Cam, is great at accessing and controlling the individual hardware components, i.e. video, floodlight and motion sensor.
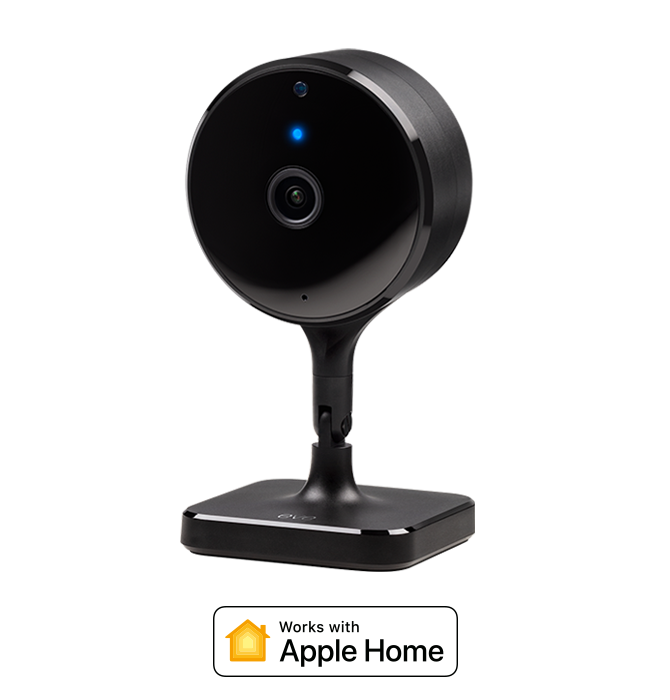
Eve displays the infrared sensor and floodlight as independent devices in Eve Outdoor Cam' detailed view. The floodlight can be switched on and off and its brightness can be adjusted up to the boost function (caution: do not look into the light when it is activated). Eve displays the currently set automatic mode of the Motion Light via a corresponding icon next to the ON/OFF switch. Just like the camera’s companion product Eve Motion, the motion sensor displays detected motion on a timeline, reports the current status (Motion or Clear) and the time elapsed since motion was last detected.
Tip: in the room view, icons below the name of your Eve Outdoor Cam show the status of the individual components, i.e. whether motion has just been detected, what status the LED shows, whether the floodlight is active and how the Motion Light is configured.

A double tap in the stream or snapshot window of the detailed view opens the live screen with the Eve exclusive push-to-talk feature. If you press and hold the microphone button, the microphone on your iPhone will be activated and the camera speaker will be turned on. Let the button go, and the iPhone microphone and camera speaker will be muted, allowing the person you can see to respond.
The gear icon lets you adjust the level of the camera speaker and microphone, the movie icon takes you quickly to the Home app and your camera recordings. Buttons for floodlight and boost help to illuminate the situation in front of the camera brightly or extremely brightly.
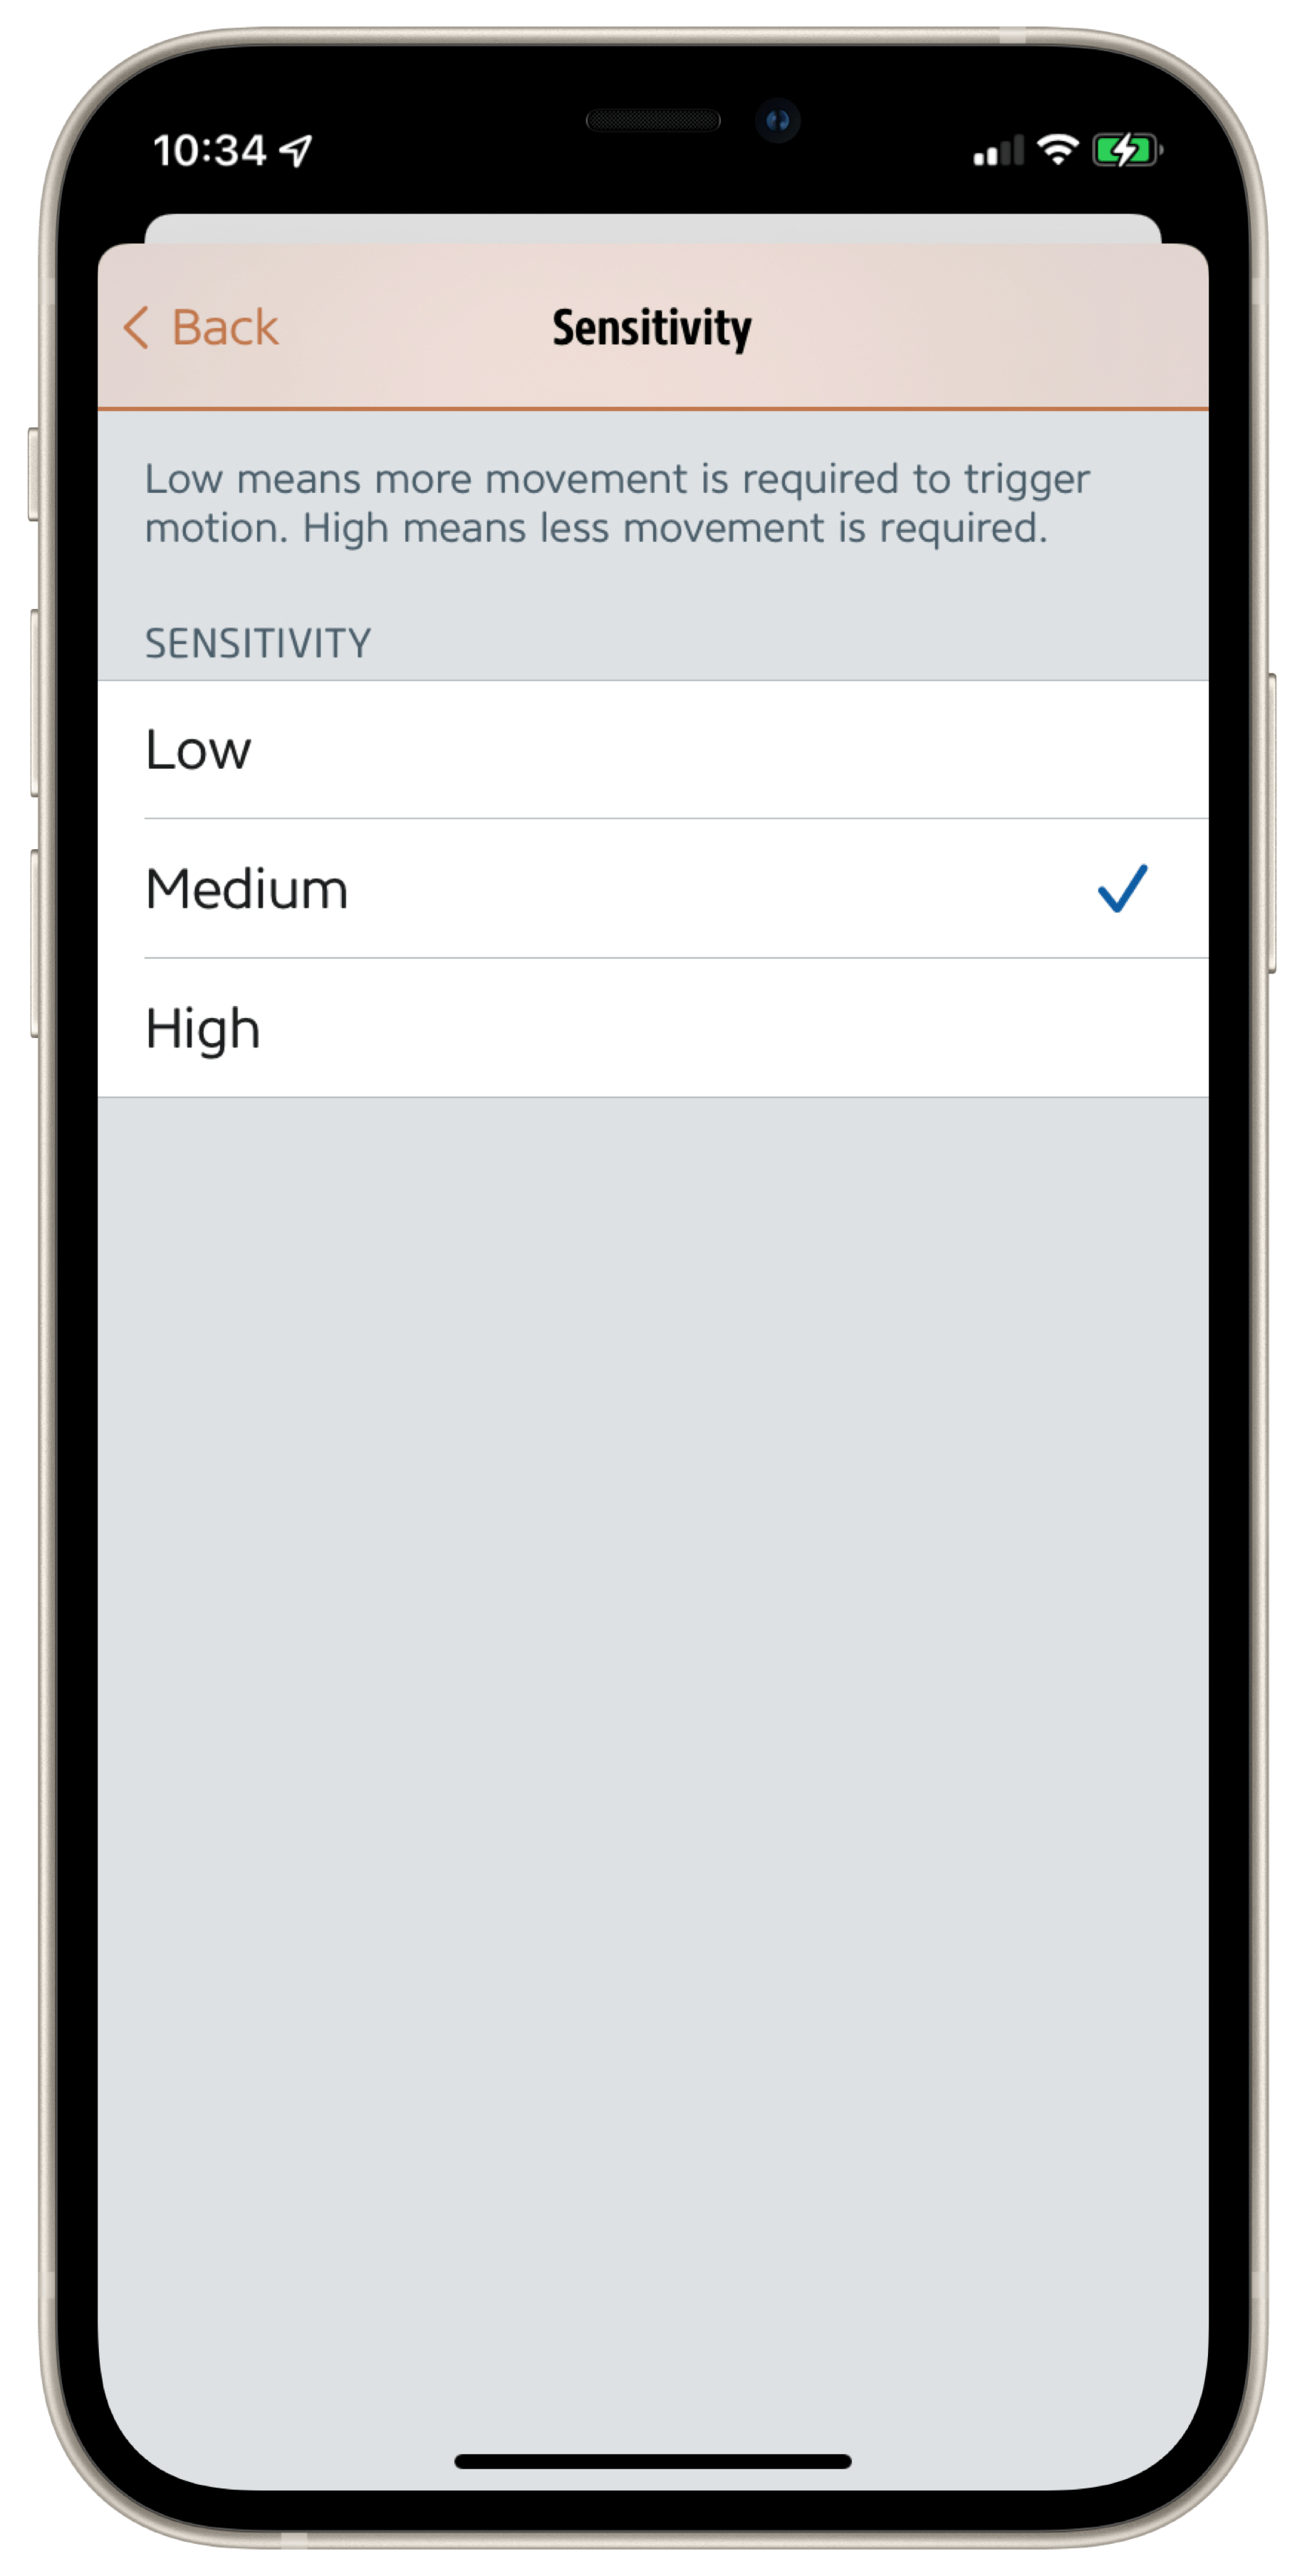
In Eve > Settings > [Eve Outdoor Cam], customize the behaviour of your camera to suit your needs. Select a sensitivity level for the motion sensor that is appropriate for the location and, if necessary, readjust after a few days if notifications seem to be missing for relevant events or too much unimportant content is reported.
The duration of the motion is especially important for automations, where e.g. switching from active to inactive triggers a scene. If set accordingly, it can also determine the number and frequency of notifications if the detected event lasts longer, such as children playing ball in the driveway.
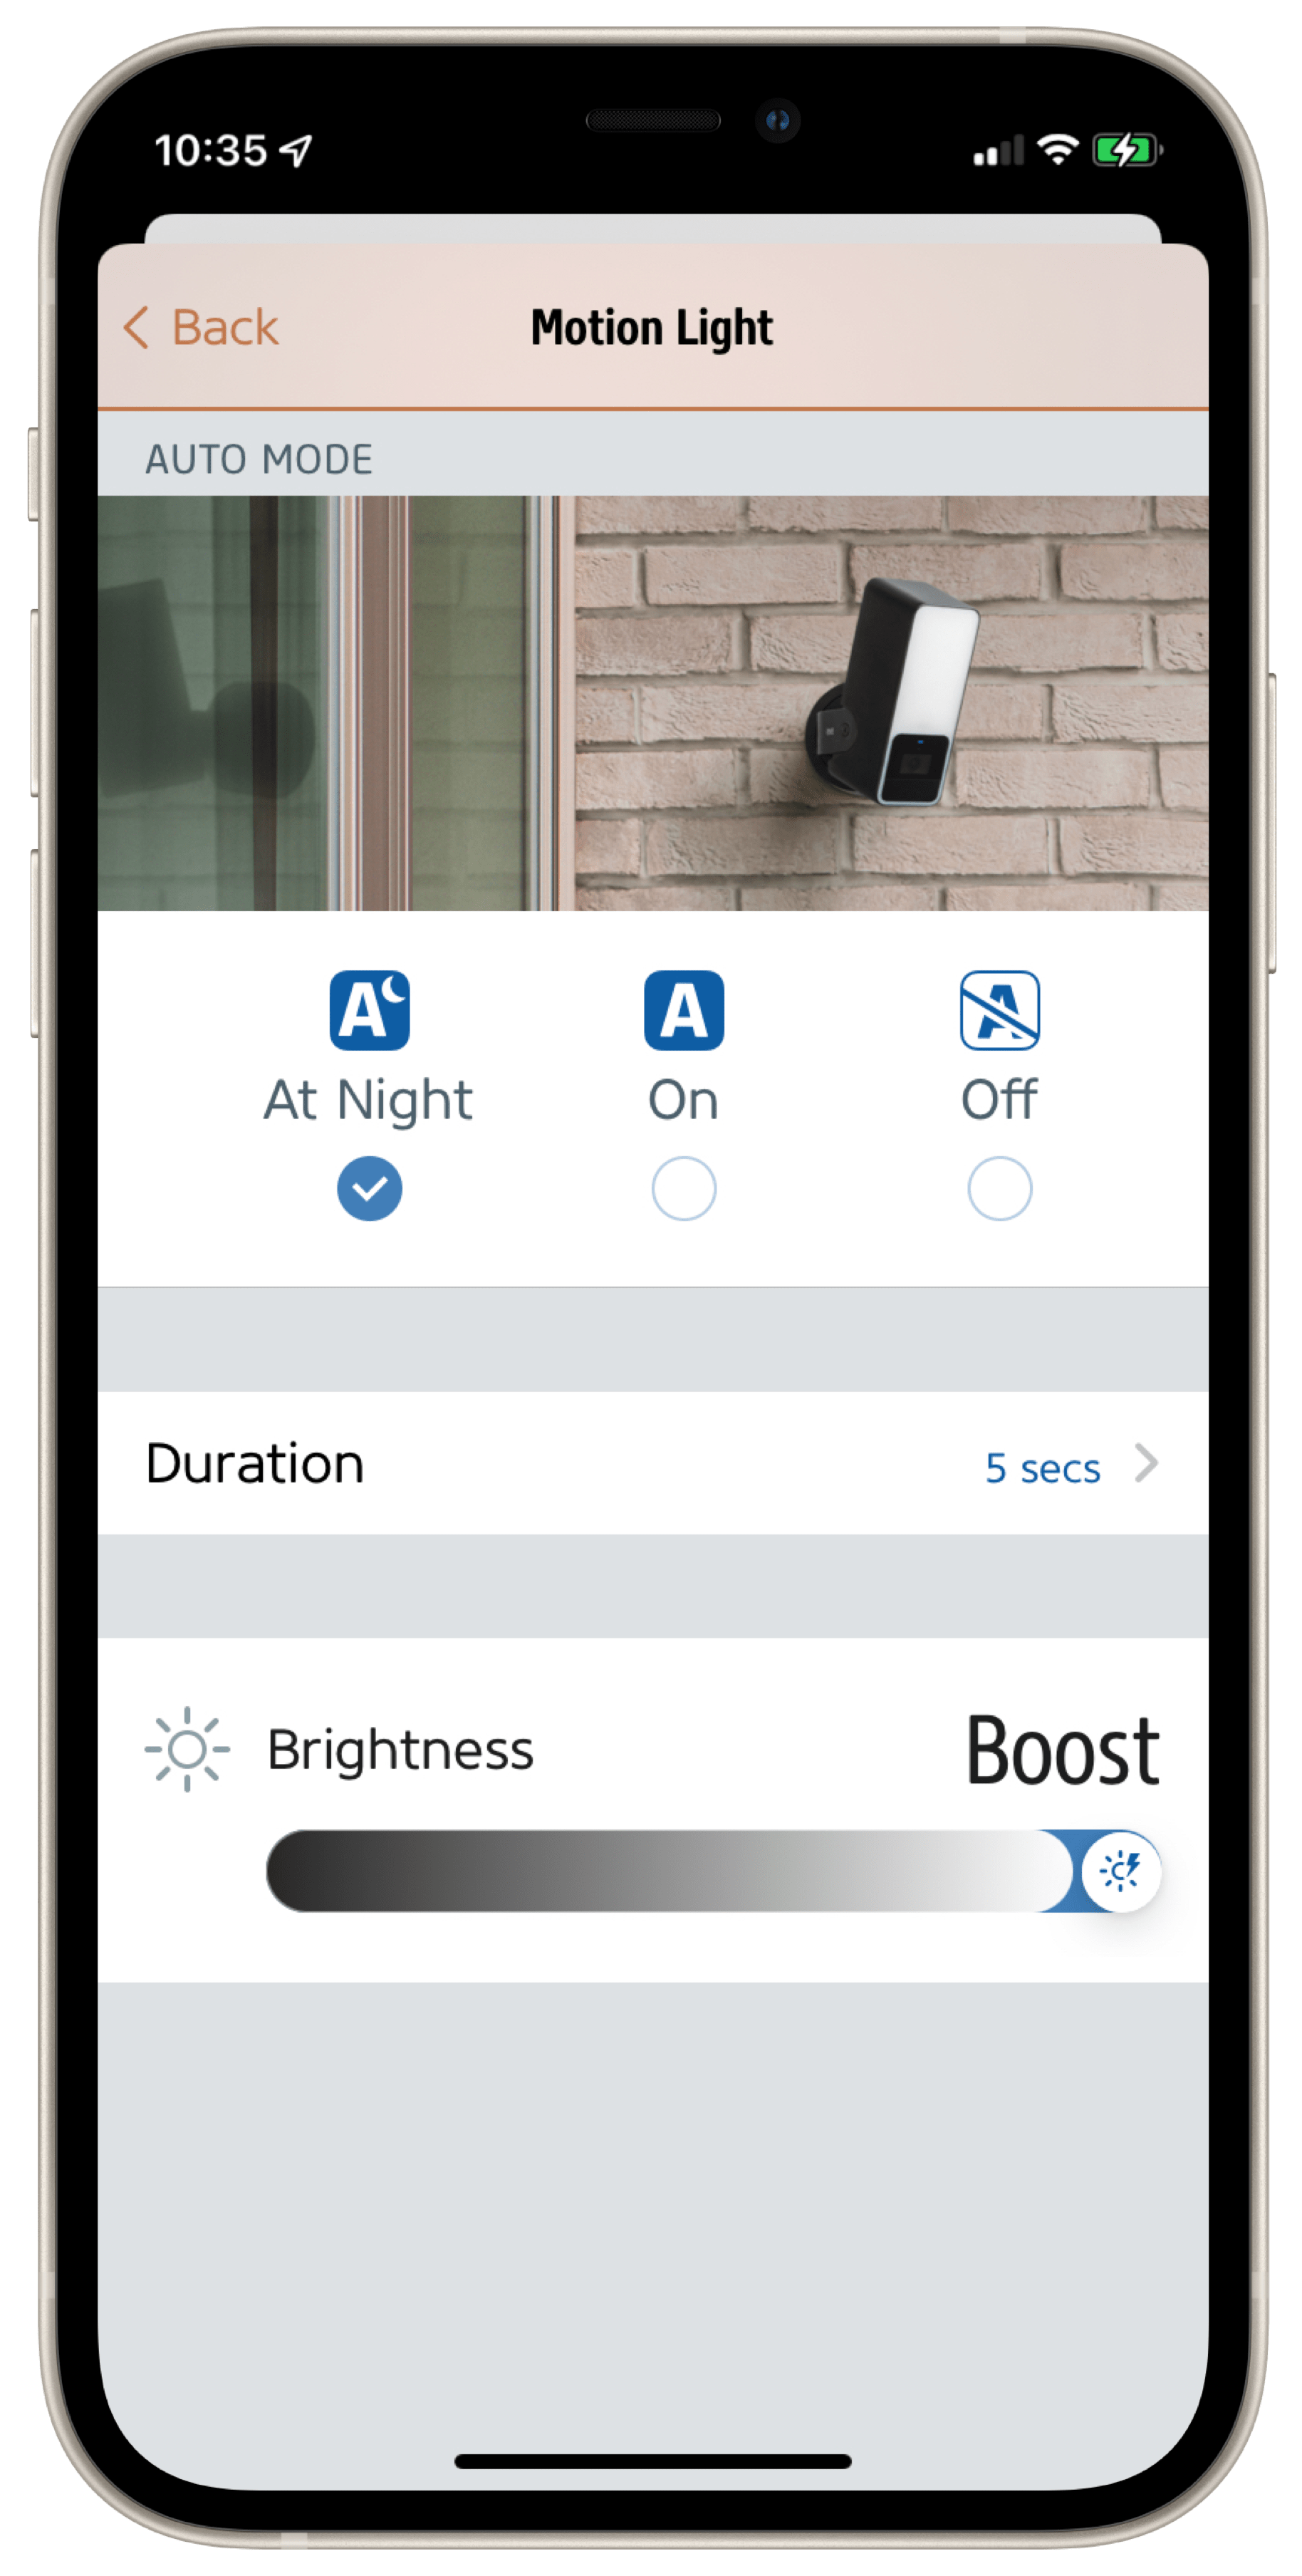
As the front line of defense, Motion Light is an elementary security feature of Eve Outdoor Cam. It is based on autonomous automation running on the device, so it works independently of HomeKit and the Wi-Fi or Internet connection. This way, the Motion Light also responds to any movement, even if HomeKit Secure Video notifications or recordings are only for specific originators.
It does, however, take into account the motion sensor's sensitivity setting, and in Eve > Settings > Eve Outdoor Cam > Motion Light, you can adjust the brightness at which you want your floodlight to illuminate activity – all the way up to Boost. Select Auto Mode > Night to include the ambient light sensor and illuminate the field of view only when it's dark. The Duration setting determines if and how long the floodlight should remain active beyond the general duration of detected motion.
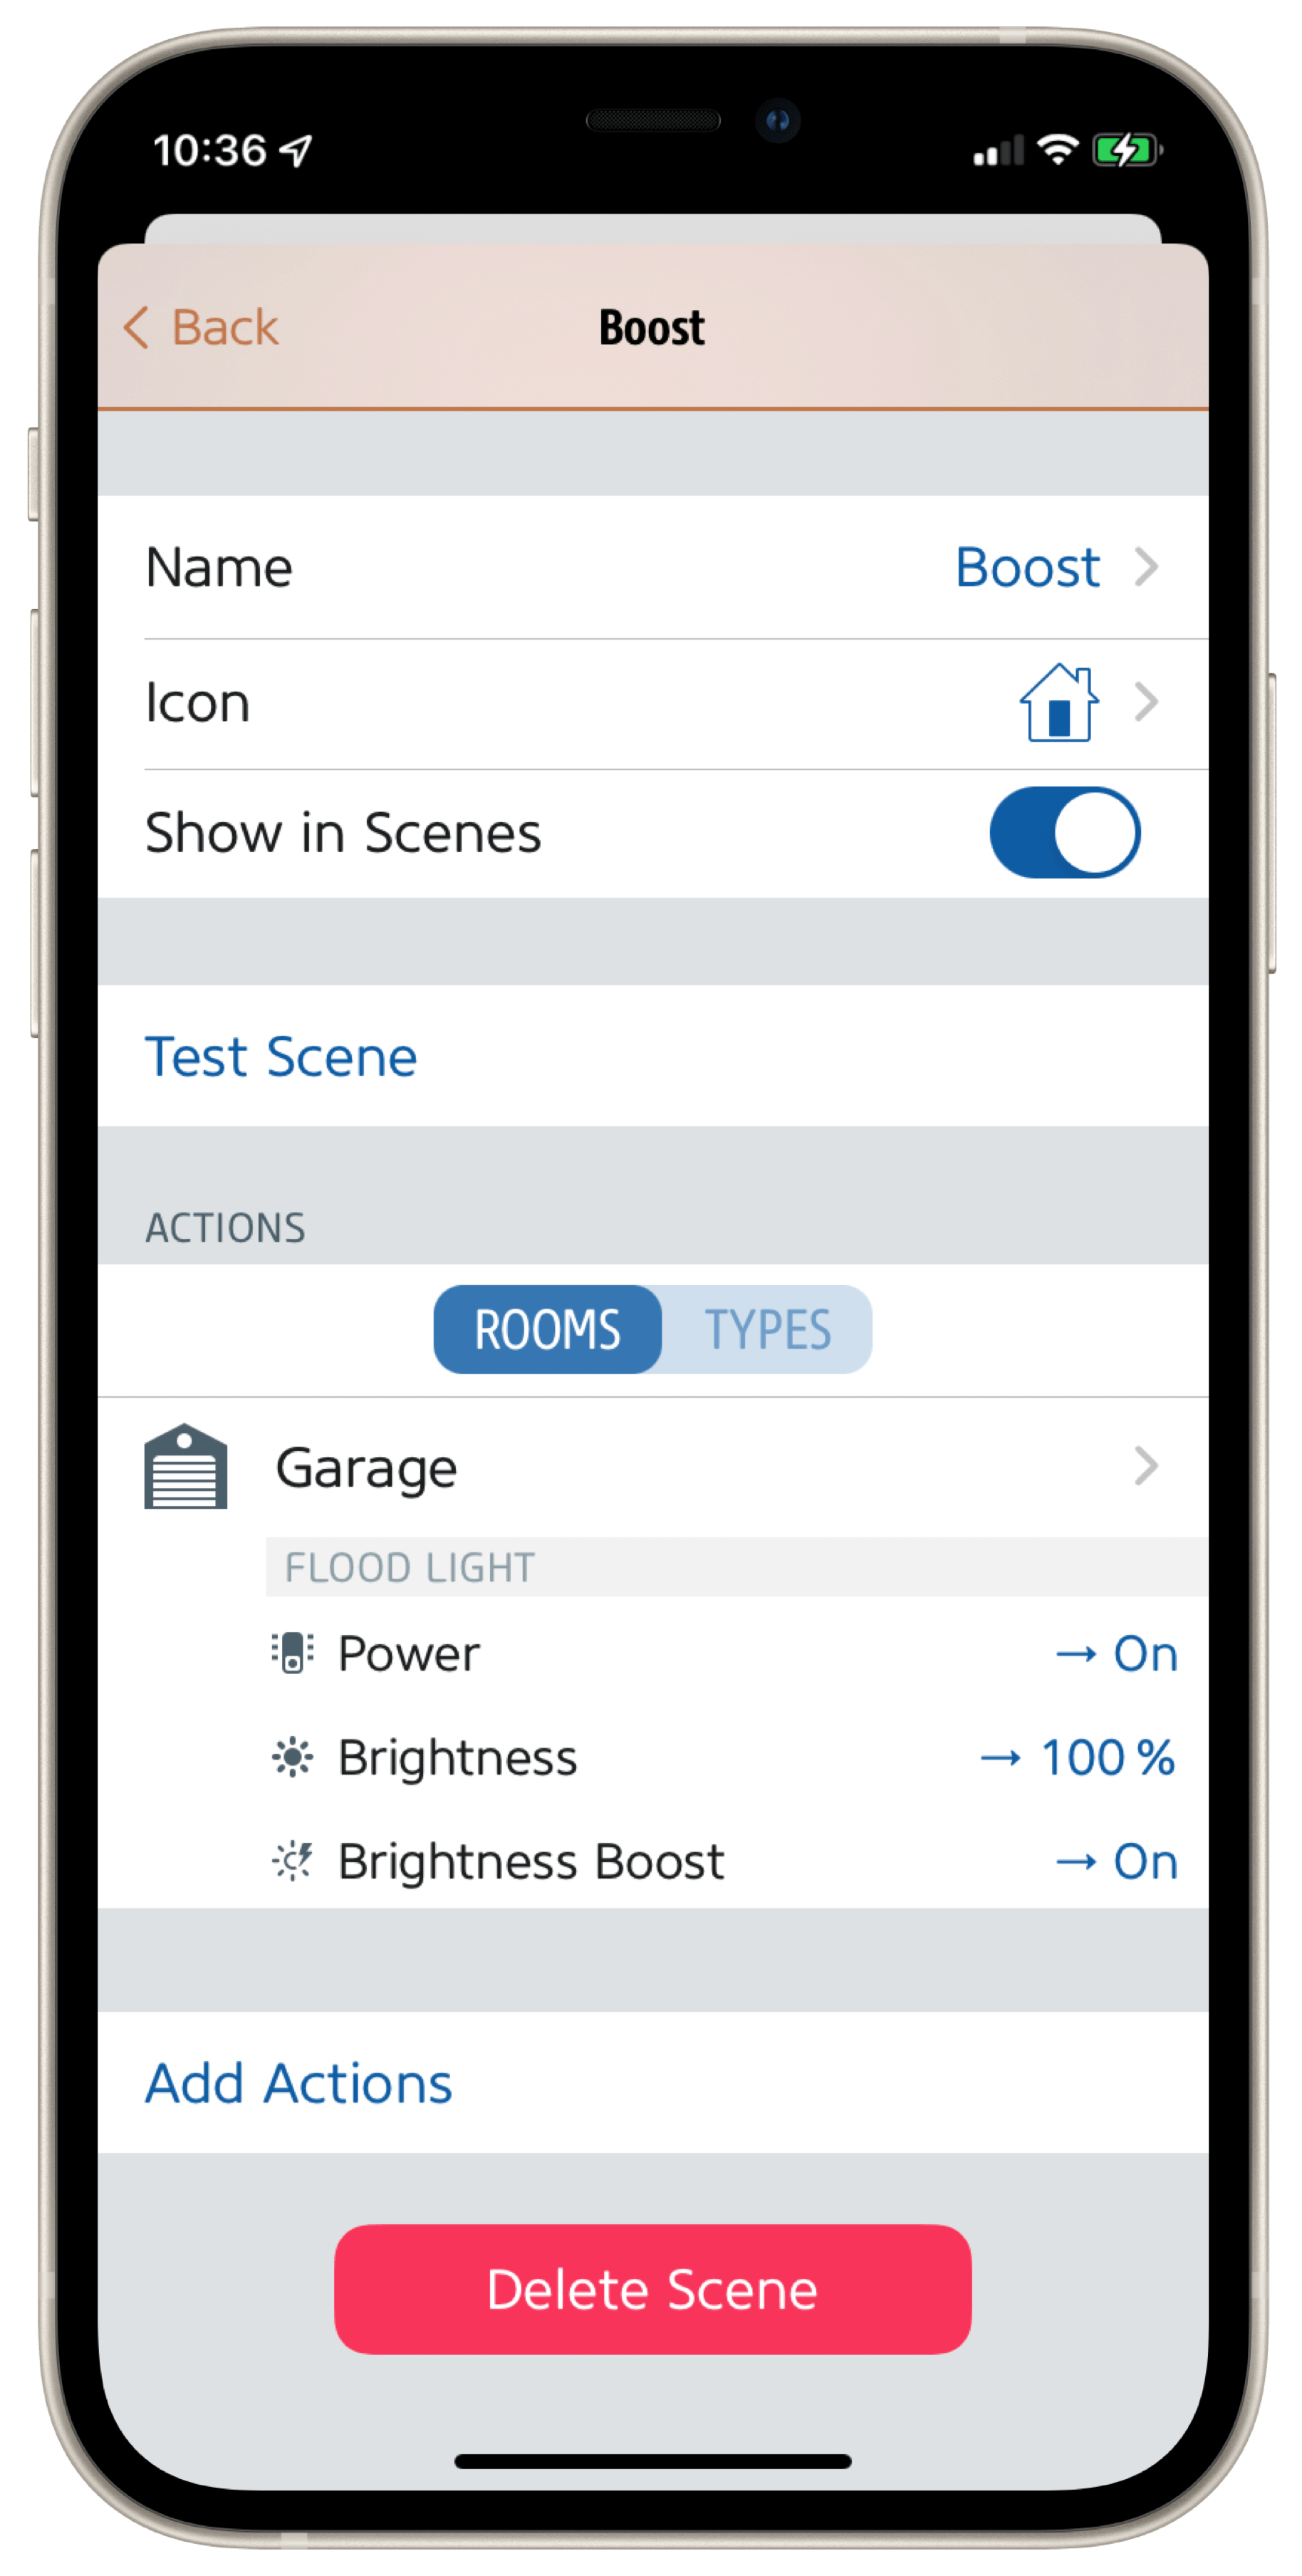
HomeKit is not aware of your floodlight's brightness boost, but the Eve app lets you create scenes with this powerful function. This makes it possible, for example, to connect additional motion sensors and thus areas outside the area monitored by Eve Outdoor Cam. Someone's approaching the back of the garden shed? On comes the floodlight, and with a Boost!
Please note: the brightness boost causes increased heat generation in the passively cooled housing and therefore switches off again after 20 seconds. However, you can reactivate it after a few seconds of cool-down time.
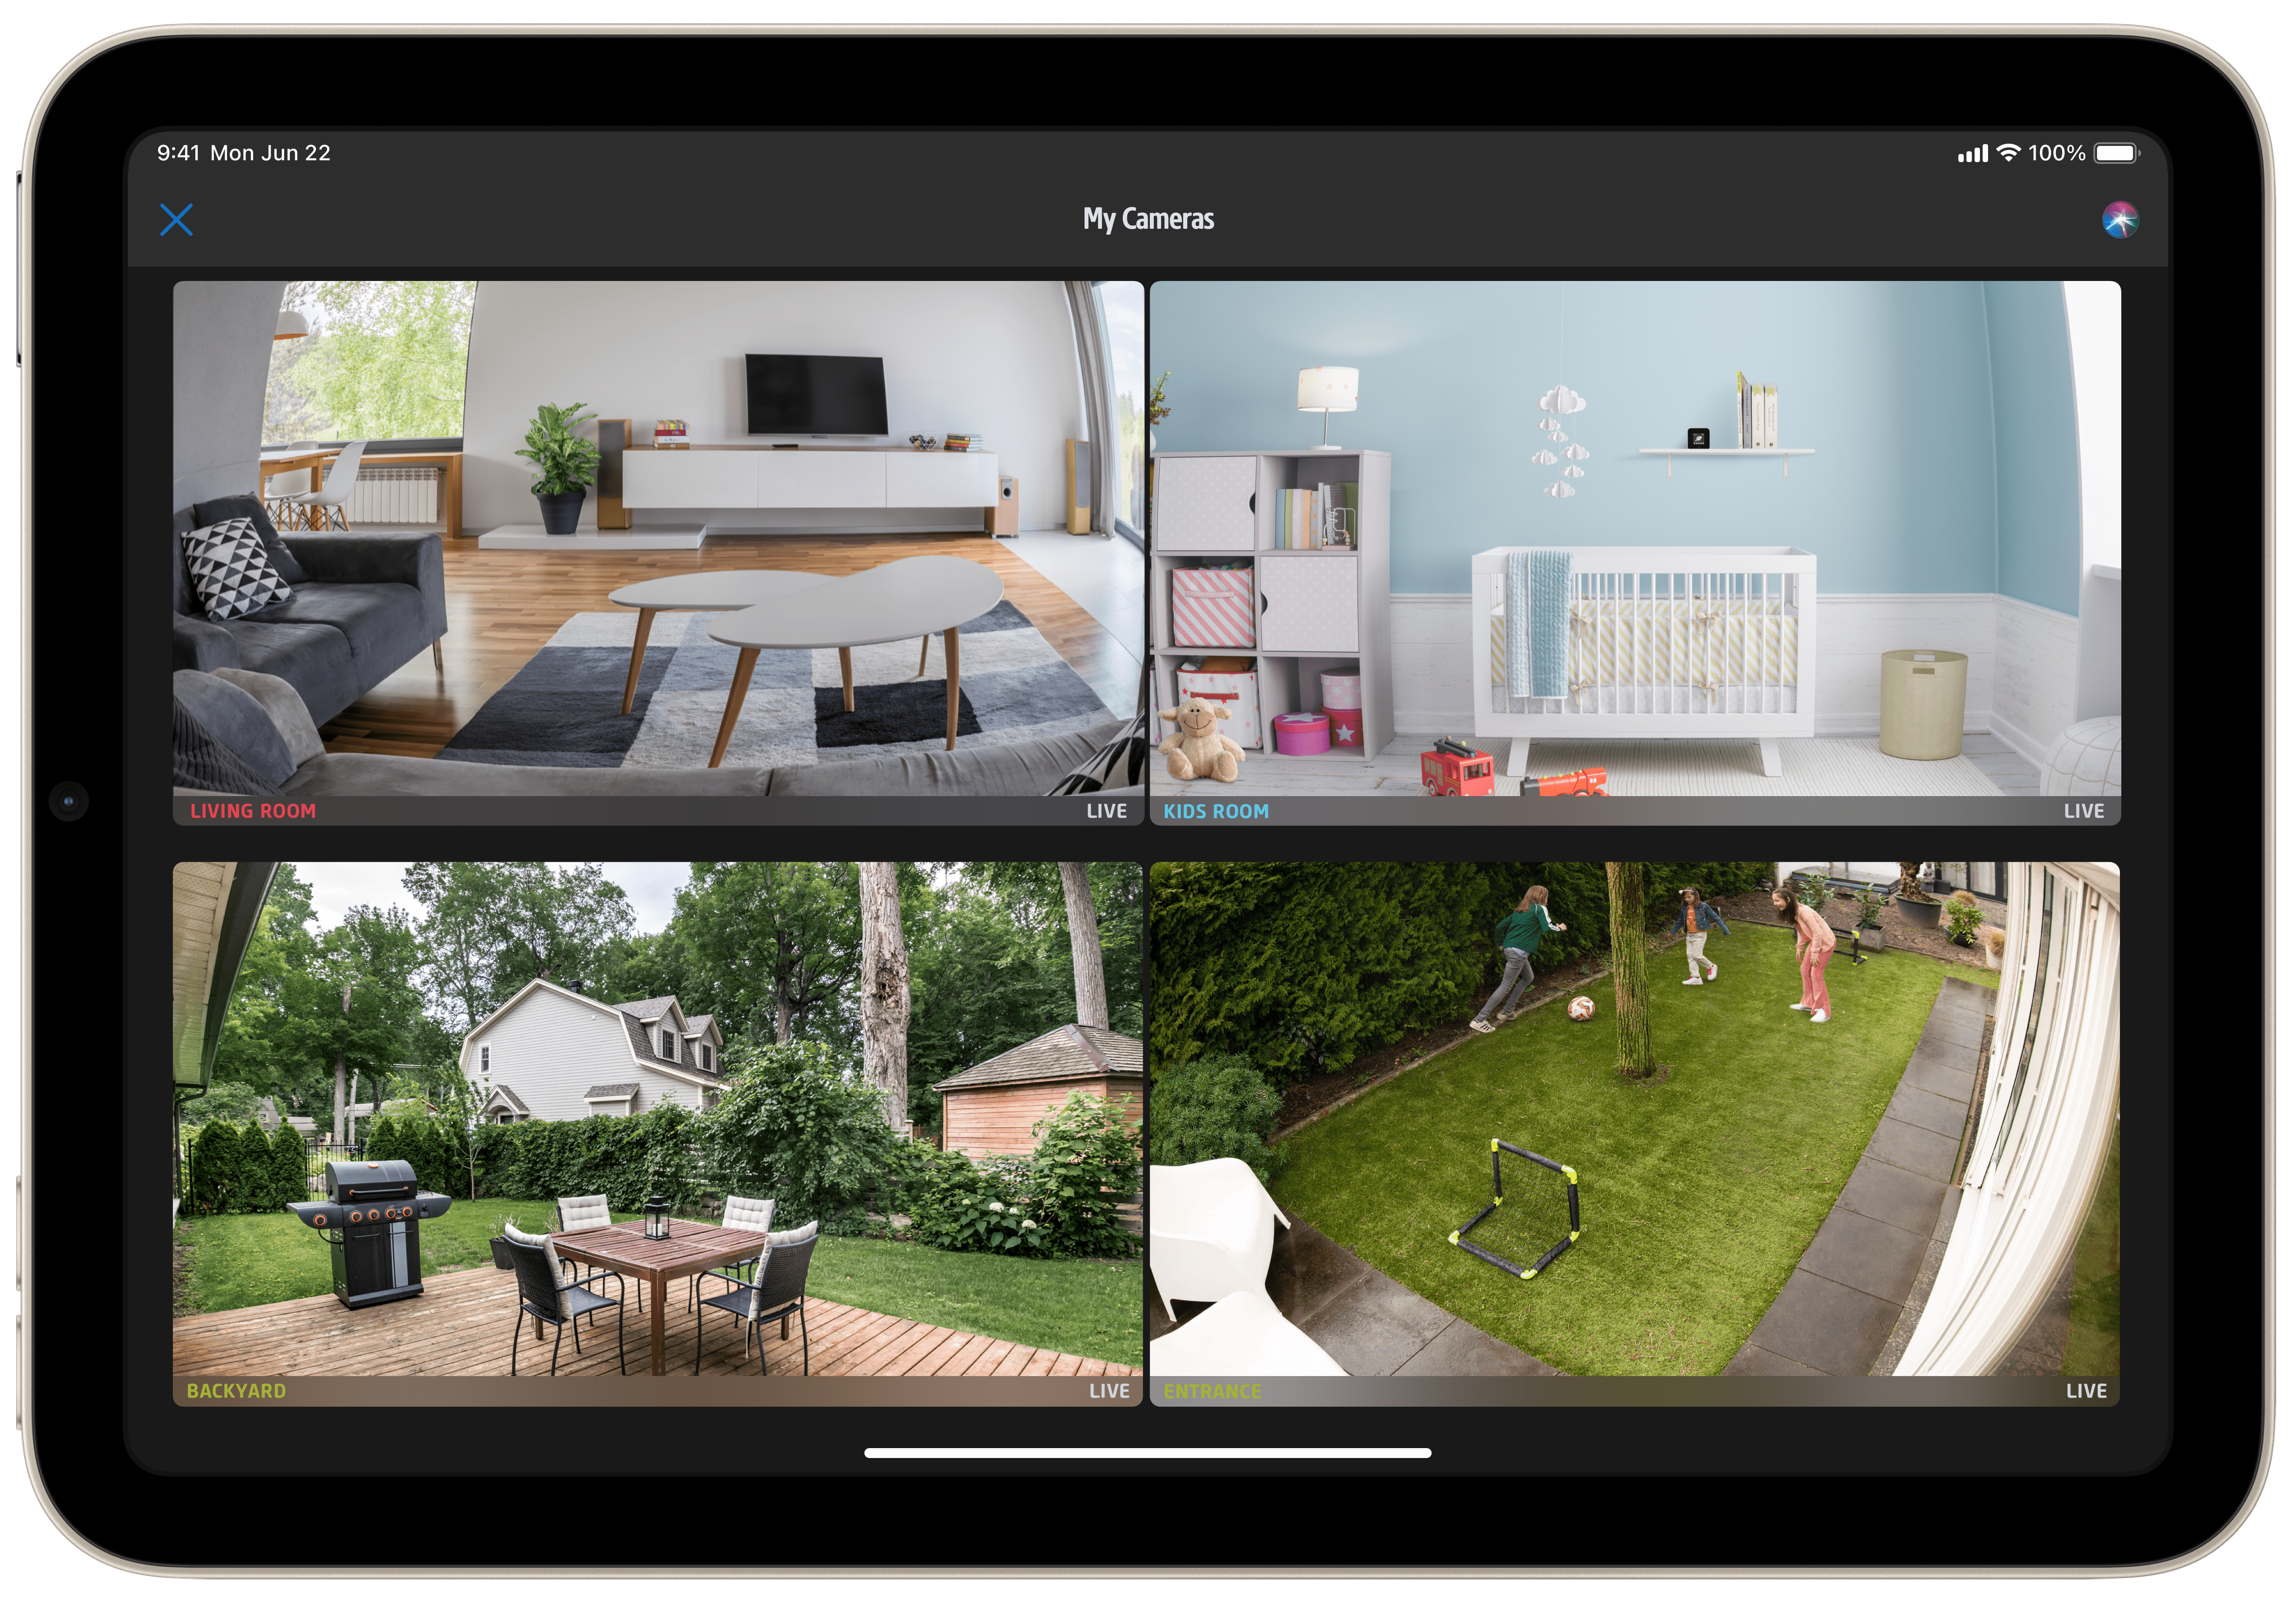
The Eve app offers a really handy function, which is great if you own several cameras. As soon as more than one HomeKit-compatible camera – regardless of manufacturer – is installed, Eve automatically expands the "At a glance" view to include a new "My cameras" tile in which all devices or their live images are displayed in groups.
Tip: tap the small list icon below the stream or snapshot window of the detailed view and you will see a log of the status events for your Eve Outdoor Cam – in other words, all the times the camera has been switched between armed/disarmed.
Troubleshooting
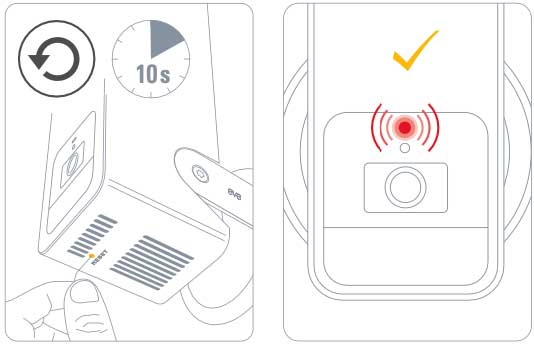
The reset button on the underside of the camera housing is easily accessible by means of a bent paper clip. It allows the camera's WLAN settings to be reset or the factory settings to be restored if the network SSID and/or password are changed.
To perform a Wi-Fi reset, push and hold the reset button on the bottom of the camera with a paper clip for 5 seconds until the LED starts blinking blue. Release the reset button as soon as the LED starts blinking blue and open the Home app to add Eve Outdoor Cam to the Wi-Fi network your iPhone is currently connected to. Factory reset: to reset all settings of Eve Outdoor Cam, including the HomeKit pairing, push and hold the reset button on the bottom of the camera with a paper clip for 10 seconds until the LED starts blinking red.
Requires iPhone or iPad with the latest version of iOS/iPadOS, HomePod or Apple TV (4th generation or later) as a home hub, Wi-Fi network (2,4 GHz 802.11b/g/n)


Requires iPhone or iPad with the latest version of iOS/iPadOS, HomePod or Apple TV (4th generation or later) as a home hub, Wi-Fi network (2,4 GHz 802.11b/g/n)
Posts you might also be interested in.
How HomeKit Secure Video works
Eve Cam and Eve Outdoor Cam were built from the ground up to protect your privacy. That's why they exclusively tap into HomeKit technology to deliver state-of-the-art privacy by design.
Eve – Welcome to a smart home that’s 100% private
Home is your most private space. The only place where you can do as you please, on your terms. However, if you live in a smart home, you will also produce loads of data that others will be only too keen to get their hands on. That’s why we...


- Reply
Halloo Albert! Steht zwar im Text, aber gern nochmal hier: 1080p/24fpsViele Grüße, Volker